Drawing Hacks: The Ultimate Playbook for Faster, Smarter Sketching
Welcome! Looking to draw faster, smarter, and maybe add a little extra 'wow' to your sketches? You're in the right spot! This page is packed with drawing hacks for artists of all levels.
If you're eager to get right to the techniques, you can jump straight to our big list of Drawing Hacks here: THE BIG LIST: ALL THE DRAWING HACKS (Jump Right In!)
But if you're curious about the 'why' and 'how' behind them, we also dive into what drawing hacks really are, their surprising history, and their psychological appeal. You'll find a huge collection of categorized hacks: beginner-friendly ones, impressive tricks, fun ideas for kids, perspective shortcuts, style-specific methods (like for anime and comics), clever uses for tools, and even brain-training habits. We also chat about their limitations, how to build solid fundamental skills alongside them, get insights from pro artists, troubleshoot common issues, and answer your frequently asked questions.
Ready to supercharge your sketching!
1. What's Inside? A Quick Look
Drawing hacks, when you get the hang of them and use them wisely, are like a superpower for artists at any level. They can speed up learning, boost confidence, and unlock your creative spark. This report dives deep into these techniques, going way beyond simple lists to give you a full picture.
We've found that the best drawing hacks often help build that initial confidence. They also make tricky things like perspective easier to grasp and cleverly use digital tools to save time. It turns out, artists have always been looking for smart ways to make their work easier, and today's hacks are just carrying on that tradition.
The real magic of drawing hacks shines when they support, not replace, learning traditional art skills. By making art less scary at first and giving quick, satisfying results, these shortcuts can light a fire for art and keep it burning. This often leads to a deeper dive into the core principles of drawing.
This playbook is all about giving you the full story, from why these hacks are so popular, to how to use them, and even a critical look at them. It's a must-have for anyone, hobbyists, teachers, students, and budding artists, who wants to sketch faster and smarter.
2. Understanding Drawing Hacks: What, Why & How Far Back?
To truly get the most out of drawing hacks, it's good to know exactly what they are, why we find them so appealing, and how they fit into the long story of art-making. This section breaks down the "drawing hack," giving a clear definition, exploring why they're so irresistible, and tracing their historical roots.
2.1. What Exactly IS a Drawing Hack?
In the art world, a "drawing hack" is generally seen as a smart, often unconventional, and efficient way to simplify or boost the drawing process. It helps artists get specific results faster or with less perceived effort.1 The term "hack" itself hints at a shortcut, an unusual use of a tool, or a clever workaround for speed.2
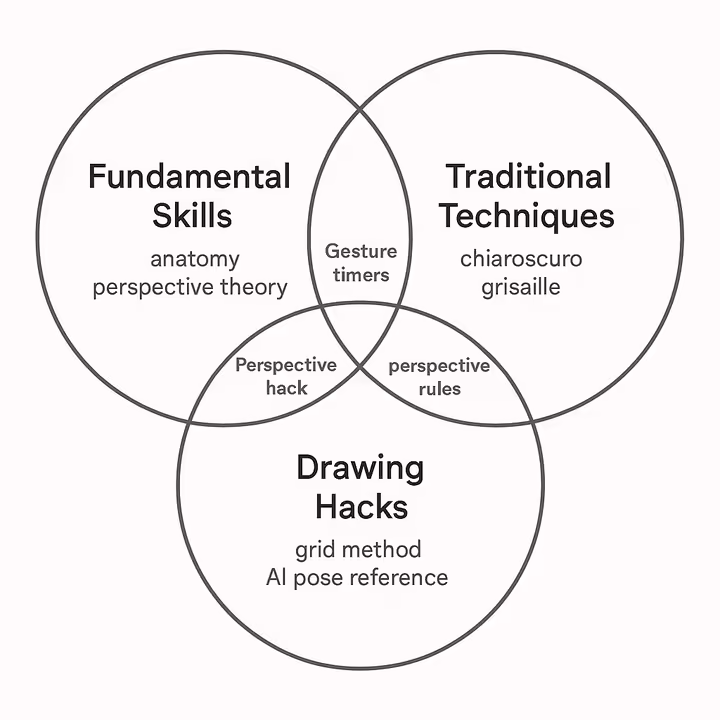
This sets hacks apart from fundamental skills, like understanding perspective, anatomy, color theory, or composition. These core skills are usually built through steady, focused practice and form the backbone of artistic ability.4 Fundamentals mean deep understanding and flexible use, while a hack might aim for just one specific outcome.
Similarly, hacks differ from traditional techniques, such as classical oil glazing or academic figure drawing methods. These are established, often formal, procedures passed down through generations, emphasizing mastery and established conventions.
A drawing hack often prioritizes an immediate result or aims to sidestep a steeper learning curve, sometimes by leveraging unorthodox approaches or materials.2 For instance, the concept of "hacking a painting" in generative art involves using rule-based or procedural shortcuts to create complex visual outputs. This illustrates how a hack can be a systematic approach rather than just a simple trick.5
The nature of a "hack" often involves a shift in perspective, allowing an artist to approach a problem or process in an innovative way. The "mind-opening" quality described by artists who discover a useful hack suggests that its value can be as much cognitive as it is technical.2 This shift in thinking can unlock new solutions and efficiencies.
Furthermore, drawing hacks exist on a spectrum of complexity and impact. They can range from simple material substitutions, like creating a DIY blending stump from rolled paper1, to more involved process modifications, such as using digital software features like Procreate's QuickShape for perfect forms6, or even employing historical aids like the camera obscura.7
Some hacks offer minor efficiencies, while others can fundamentally alter an artist's workflow or the way they perceive a task. A comprehensive understanding of drawing hacks must therefore accommodate this breadth, recognizing them as a diverse set of strategies rather than a monolithic category.
2.2. The Appeal of Shortcuts: Why We Love 'Em
The widespread popularity of drawing hacks can be pinned on a mix of psychological factors that connect with basic aspects of learning, motivation, and how our brains work. These techniques strike a chord because they tackle common hurdles and desires that both new and seasoned artists face.
One of the main attractions is their knack for lowering barriers to entry. For many, the idea of learning to draw can seem overwhelming, often linked with long hours of practice and the fear of not having "talent."8 Hacks offer easy-to-reach starting points, making those first steps into art feel less scary and more doable.10 This is key to overcoming that "I can't draw" feeling that so often snuffs out creative sparks.
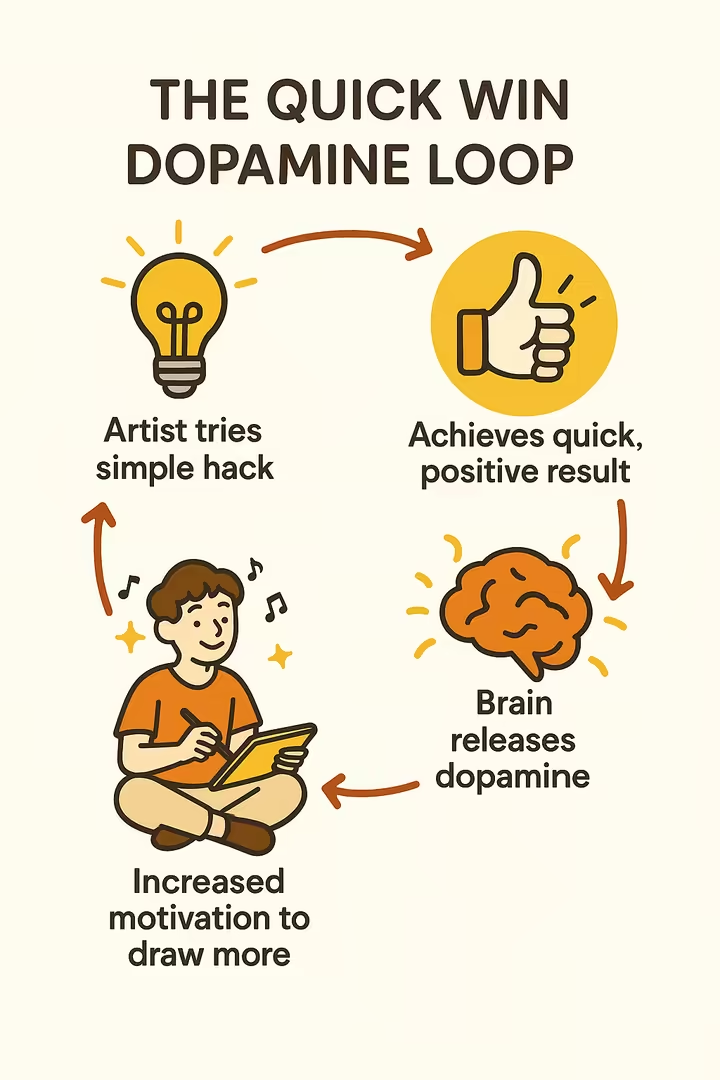
Right alongside this is the power of providing quick wins. When a hack lets an artist achieve a pleasing result with relative ease, it fires up the brain's reward system by releasing dopamine.12 This natural chemical reward reinforces the behavior, boosting motivation, self-belief, and the desire to keep practicing.
Each small success acts like a pat on the back, creating a positive loop that encourages more engagement with art. The "5-minute rule," for example, taps into this by making tasks feel manageable, leading to a sense of accomplishment even with a tiny time investment.12
Drawing hacks can also gamify the learning process. By throwing in elements of experimentation, quick feedback, and the thrill of discovering "clever tricks," hacks can make practice feel more like a game.14 This playful vibe can boost engagement and make learning more enjoyable, turning potentially dull drills into exciting explorations.
From a cognitive science angle, hacks often act as effective cognitive shortcuts or heuristics. Our brains are naturally wired to seek efficiency and save mental energy.16 Hacks that simplify complex decisions or steps, like using basic shapes to build a figure or a simple rule for perspective, cut down on mental effort.
This aligns with what's called System 1 thinking, which is fast, automatic, and intuitive. It lets artists sidestep the more laborious, analytical System 2 thinking for certain tasks.16
Moreover, some "impressive" hacks get their charm from principles similar to misdirection or illusion, much like those used in magic.18 A relatively simple action or tool can whip up a disproportionately striking visual effect, delighting the artist and viewers by playing on how we see things.
While cognitive hacking can have a darker side in other contexts,19 the core idea of tweaking perception for a desired outcome is relevant to the "wow" factor of certain visual tricks.
The main psychological job of many drawing hacks, especially for beginners, is to build confidence. Early wins, made possible by hacks, help combat negative self-talk and foster a belief in one's ability to learn and get better.8 This confidence is a vital psychological launchpad for undertaking the sustained effort needed to master fundamental skills.
The term "hack" itself can also carry an exciting hint of accessing "secret knowledge" or a clever, not-so-obvious solution that others might not know.1 This offers a sense of advantage and satisfaction, tapping into our natural drive for mastery and discovery. Finally, hacks can help address the fear of failure.
Many aspiring artists are paralyzed by the anxiety of making mistakes or producing "bad" art.21 Hacks offer a lower-stakes path to experiment and create something satisfying, thereby reducing this fear and encouraging continued practice.16
2.3. A Bit of History: Are Drawing Hacks a New Thing?
While "hack" is a modern word, the basic idea of using clever tools, shortcuts, and smart methods to make drawing easier or achieve specific visual effects is far from new. Artists throughout history have always looked for and used aids to boost their accuracy, efficiency, and expressive power. Digging into these historical precedents shows that drawing "hacks" are part of a long, rich tradition of artistic innovation and problem-solving.
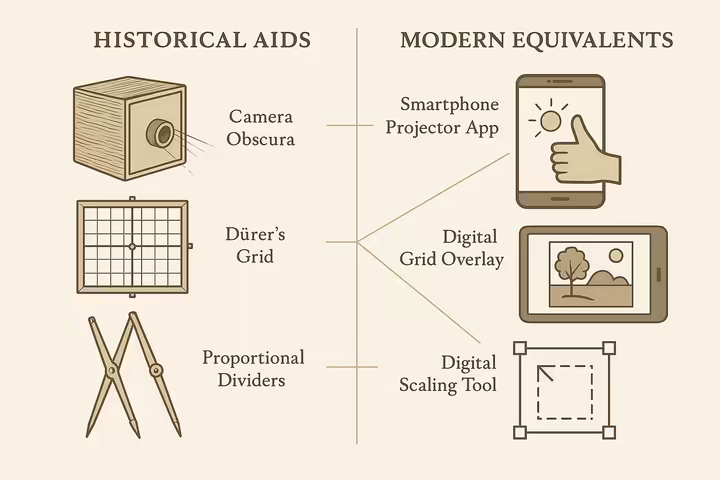
One of the most famous historical drawing aids is the camera obscura. Latin for "dark room," this device cleverly projects an image of its surroundings onto a screen. This allowed artists to trace or reference it for their compositions, getting a head start on complex scenes.
The principles behind it were known to Chinese scholars way back in the fifth century BCE!7 By the 16th century, Western artists began using it as a drawing aid, projecting images onto canvas or paper to achieve remarkable realism and spot-on perspective.7
Initially, these were simple pinhole devices. But camera obscuras evolved with the addition of lenses in the mid-16th and early 17th centuries, which produced sharper and brighter images.7 Mirrors were also incorporated to project the image right-side up, making them even more practical.7 Famous painters like Canaletto are well-documented users, and his own camera obscura still exists today!22
While its use by Johannes Vermeer is more debated, the camera obscura was widely employed by landscape and portrait artists until the arrival of chemical photography.22 This tool effectively "hacked" the difficult challenge of capturing complex scenes with precise perspective and detail.
Another significant historical "hack" is the drawing grid, often associated with the renowned artist Albrecht Dürer. Around the early 16th century, Dürer illustrated and described devices such as a "perspective machine" or "Dürer's Door." This involved viewing a subject through a gridded frame and then transferring the image, square by square, to a similarly gridded drawing surface.23
This gridding system allowed artists to analyze a scene in smaller, more manageable segments. This made it far easier to judge distances, angles, and proportions, thus achieving a much more accurate interpretation of what they saw.23 Grids weren't just for nailing accuracy; they were also a common Old Master trick for scaling sketches up to larger formats, especially when time was tight.23
Proportional dividers represent another category of ingenious historical drawing aids. These instruments, which typically have points at both ends and an adjustable pivot, allow users to transfer measurements at a set proportion. This facilitated the creation of scale drawings or the accurate enlargement or reduction of existing ones.25
Engineers, surveyors, and draftsmen have long relied on them. Artists also found them incredibly valuable for maintaining consistent proportions across different scales.25 An interesting example is Maurice Kidjel's "Cali-Pro" proportional dividers from the 1960s. These were uniquely designed to always maintain a specific "universal ratio" of 5.333:1, which Kidjel believed held special artistic and mathematical significance.25
These historical examples clearly demonstrate that the quest for efficiency, accuracy, and methods to simplify complex representational tasks is an enduring aspect of artistic practice. The tools and techniques may have evolved, from optical devices and mechanical instruments to sophisticated digital software algorithms, but the underlying drive remains the same. Recognizing this lineage can help legitimize the use of contemporary hacks.
It frames them not as "cheating," but as intelligent applications of available resources to solve artistic problems, much like the masters of the past did.23 The development of these aids was often catalyzed by technological advancements of their time, better lenses for the camera obscura,7 precision in metalworking for dividers. This is just as digital technology fuels many of today's drawing hacks. Modern shortcuts are, in essence, a vibrant continuation of this long-standing tradition of artistic ingenuity.
3. THE BIG LIST: ALL THE DRAWING HACKS (Jump Right In!)
This compendium offers a detailed exploration of diverse drawing hacks, all neatly categorized to suit various artistic needs, skill levels, and interests. Each hack is carefully analyzed: we look at the technique itself, the principles behind why it works, the materials and time you'll need, who it's best suited for, its effectiveness, potential caveats to watch out for, and verification through multiple sources where possible. Get ready to discover some game-changing tricks!
3.1. Getting Started: Foundational Hacks for New Artists
These hacks are specifically designed to build that crucial initial confidence. They aim to demystify the drawing process and help overcome the common "I can't draw" mentality by providing accessible entry points and fostering early successes. Think of them as targeting those perceptual and psychological barriers that can hold you back.
-
Gesture Drawing Timers
(Example: Proko - Gesture Drawing Basics)
- Technique Description: Imagine setting a quick timer – anywhere from 20 seconds to 2 minutes. Your goal? To rapidly sketch a subject, often a human figure or animal.8 You're not aiming for perfect details, but for the raw movement, energy, and overall shape. The challenge is to capture the pose's essence before time's up!
- Why It Works: This exercise forces you to observe quickly and pick out the most vital lines that show action and flow.4 It helps develop hand-eye coordination, speeds up your observation, and encourages a looser, more expressive line quality by stopping you from overthinking and getting lost in details.8 It really shifts your focus from the final product to the process itself.
- Materials & Time Needed: A sketchbook or some loose paper, and a drawing tool that glides smoothly (like a soft graphite pencil, charcoal, Conte crayon, or its digital equivalent). A typical session might involve just 5-15 minutes of these quick, timed drawings.
- Skill Level & Audience: Perfect for absolute beginners all the way to intermediate artists who want to inject more dynamism and sharpness into their observational skills.
- Effectiveness & Evidence: This is a widely recommended exercise in foundational art programs and by countless instructors. It's seen as crucial for understanding form and movement.8 Many online resources showcase just how effective it can be.
- Caveats & Common Mistakes: Your first few attempts will likely look very rough and unfinished, which can be a bit disheartening if you misunderstand the purpose. Remember, the focus is on capturing the gesture, not on creating a polished drawing. Try to avoid tensing up; stay loose and fluid!
- Verification: Supported by multiple art education sources. 4
-
Using Basic Shapes for Construction
(Example: Art for Kids Hub - How To Draw A Cartoon Dog -
https://www.youtube.com/watch?v=dEPSg6I4RUA
- often uses this principle)
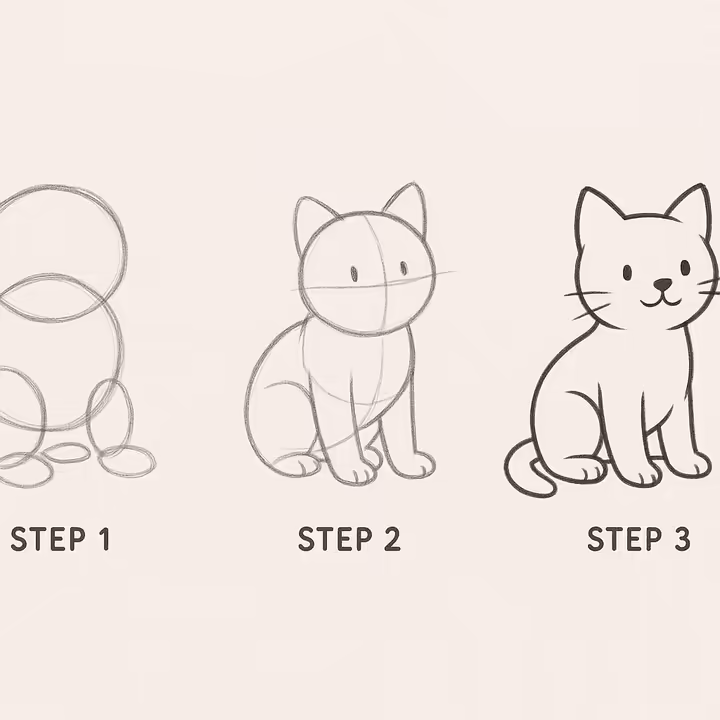
- Technique Description: This fundamental hack is all about simplifying complex subjects, like figures, animals, or objects, into their basic geometric building blocks. Think circles, ovals, squares, rectangles, triangles, and cylinders.2 These simple shapes form an initial structural framework, which you then gradually refine and combine to build the final form.
- Why It Works: Breaking down complexity into simple, recognizable shapes makes drawing feel much less intimidating and more manageable, especially for beginners.9 It's a great way to establish correct proportions, placement, and the overall structure of your subject before you even think about committing to details, aligning perfectly with constructive drawing principles.
- Materials & Time Needed: Just a pencil, paper, and an eraser. Learning the concept can take as little as 5-15 minutes, but you'll find yourself applying it continuously as you draw.
- Skill Level & Audience: Primarily aimed at beginners, but honestly, it's useful for any artist when they're tackling unfamiliar or complex subjects.
- Effectiveness & Evidence: This is a cornerstone technique you'll find in countless drawing tutorials, art instruction books, and foundational art teaching methods.2 It's everywhere for a reason!
- Caveats & Common Mistakes: For this to work well, the initial shapes must be drawn with attention to their relative size, placement, and even a bit of perspective. There's a slight risk of drawings appearing stiff or "blocky" if you don't move beyond the basic shapes to refine contours and add those lovely organic qualities.
- Verification: Widely corroborated across art instructional materials. 2
-
Stick-Figure-to-Human-Form Methods (Armatures)
(Example: Restless.co.uk - Figure Drawing Tips -
8
)
- Technique Description: This method involves kicking off a human figure drawing with a simplified "armature" or an enhanced stick figure. It goes beyond just basic sticks by including elements like lines for shoulders and hips, simple shapes for hands and feet, and indications of bends in the limbs.8 This provides a foundational structure for the pose you're aiming for.
- Why It Works: It offers a super quick way to establish the pose, balance, proportions, and line of action of a figure. You can do this without getting immediately bogged down in complex anatomical details.8 This builds a structural base upon which more detailed forms can then be developed.
- Materials & Time Needed: Pencil and paper are all you need. Each figure armature can be sketched out in just 1-5 minutes, making it a fast and efficient start.
- Skill Level & Audience: Especially helpful for beginners who are just starting out with figure drawing.
- Effectiveness & Evidence: Highly recommended as a starting point for beginners learning to capture the human form and its dynamic poses.8
- Caveats & Common Mistakes: To make the armature effective, you'll need a basic grasp of human proportions (like the relative length of the torso to the legs). Also, remember to draw the armature lightly so it can be easily built upon or erased as you refine your drawing.
- Verification: Supported by many figure drawing guides aimed at beginners. 8
-
Drawing Upside Down
(Example: Based on Betty Edwards' "Drawing on the Right Side of the Brain")
- Technique Description: This fascinating technique involves taking a reference image (often a line drawing or photo) and flipping it upside down. You then copy the image onto your paper, also working with your drawing paper oriented upside down.9 It might feel strange at first, but the results can be surprising!
- Why It Works: This clever trick helps to "outsmart" the dominant, analytical left hemisphere of your brain, which loves to label and interpret familiar objects. By presenting the image in an unfamiliar orientation, your brain is forced to process it purely in terms of abstract shapes, lines, angles, and spatial relationships, functions more associated with the right hemisphere.9 This often leads to much more accurate observation and copying, as you start drawing what you truly see rather than what you think you see.
- Materials & Time Needed: You'll need a reference image (line art works great to start with), a pencil, and paper. Allow about 15-45 minutes for an exercise, depending on how complex the image is.
- Skill Level & Audience: Fantastic for beginners who are struggling with observational accuracy or trying to overcome preconceived notions about how things "should" look.
- Effectiveness & Evidence: This technique was popularized by Betty Edwards in her hugely influential book, "Drawing on the Right Side of the Brain," and is widely used in art education.29 Many people report significant improvements in their observational drawing skills after trying it.
- Caveats & Common Mistakes: It can feel quite disorienting and counter-intuitive when you first try it. Remember, its primary purpose is as an observational training exercise, not necessarily a method for every drawing task. It's a good idea to choose a reference that isn't too complex when you're starting out.
- Verification: This is a core concept from a major art education methodology. 9
3.2. Impress Your Friends: Cool "Wow Effect" Hacks
These techniques often become popular because they can produce a visually striking "wow" effect with surprisingly little effort. They cleverly leverage principles like high contrast, optical illusions, or efficient texture creation to achieve rapid visual impact. Get ready to impress!
-
Smudging for Gradients/Smooth Shading
(Example: Sky Rye Design - Blending with Tortillon -
9
)
- Technique Description: This involves using your finger, a dedicated blending stump (also known as a tortillon, often made of tightly rolled paper), a piece of cloth, or even a tissue. You gently rub and blend drawn marks (typically graphite or charcoal) on the paper.9 This action softens lines and creates beautifully smooth transitions between different tones.
- Why It Works: The physical act of rubbing spreads the loose pigment particles across the paper's surface. This fills in the "tooth" (the texture) of the paper and softens the edges of your strokes.9 The result is an even and continuous gradient, which our eyes perceive as a smooth, often realistic, surface.
- Materials & Time Needed: Graphite pencils or charcoal sticks, drawing paper, and a blending tool (optional but recommended: blending stump, tortillon, soft cloth, tissue). Learning the basic technique takes only a few minutes!
- Skill Level & Audience: Great for beginners to intermediate artists looking to achieve smoother shading.
- Effectiveness & Evidence: This is a very common technique for achieving realism and smooth shading quickly, especially with dry media like pencil and charcoal.9 You'll find many tutorials demonstrating its use for portraits and still lifes.
-
Caveats & Common Mistakes:
- Muddiness: Be careful not to over-blend or blend too many layers of different values, as this can result in a muddy, undefined appearance.
- Loss of Texture: Smudging can sometimes obliterate paper texture and subtle line work if not used judiciously. A light touch is often best.
- Oils from Fingers: If you use your fingers to blend, be aware that skin oils can transfer to the paper. This might cause uneven absorption of pigment or even yellowing over time. It's generally better to use a dedicated tool.1
- Control: Achieving precise, controlled blends takes a bit of practice; beginners might smudge areas unintentionally at first.
- Verification: Widely documented in drawing tutorials and guides. 9
-
White Gel Pen / Opaque White Paint Highlights
(Example: Jazza - Using White Gel Pens -
https://www.youtube.com/watch?v=zjjj9g04t0s
- illustrative example of type of content)
- Technique Description: This hack involves adding bright, opaque white highlights to your drawing. You can use a white gel pen, a white paint marker, or even opaque white paint (like gouache applied with a fine brush). This is often done as a final touch and is particularly effective on toned paper or over areas of dark media like ink or marker.
- Why It Works: It creates striking points of light and high contrast against darker areas. This instantly enhances the illusion of shininess, wetness, or intense illumination. These highlights act as focal points and can really make a drawing "pop" off the page!
- Materials & Time Needed: A white gel pen (e.g., Sakura Gelly Roll, Uni-ball Signo Broad), a white paint marker (e.g., Posca), or white gouache and a fine brush, plus your drawing. Applying these highlights takes just seconds to minutes.
- Skill Level & Audience: Suitable for all skill levels – anyone can add a bit of sparkle!
- Effectiveness & Evidence: This is an extremely popular technique in illustration, comic art, manga, concept art, and mixed-media work. You'll find abundant examples and tutorials on YouTube, Instagram, TikTok, and Pinterest.
-
Caveats & Common Mistakes:
- Overuse: Be careful not to go overboard! Too many highlights, or highlights that are too large, can look artificial and distracting.
- Placement: For highlights to be convincing, they must be placed consistently according to your implied light source. Think about where the light would naturally hit the object.
- Bleeding/Coverage: Make sure the underlying drawing medium is completely dry before applying, especially if you're working over wet media. Some gel pens might need a second pass for full opacity on very dark surfaces.
- Clogging: Gel pen tips can sometimes clog. Store them properly (often horizontally or tip-down) and give them a little test scribble before applying to your artwork.
- Verification: While not a specific snippet, this is a ubiquitous technique in contemporary illustration, easily verified across numerous online art communities and tutorial platforms.
-
Negative Space Drawing Tricks
(Example: Betty Edwards' "Drawing on the Right Side of the Brain" discusses negative space extensively)
- Technique Description: This intriguing technique involves shifting your focus from drawing the subject itself (the positive space) to drawing the shapes of the empty areas around and between parts of the subject (the negative space).29 For example, when drawing a chair, you wouldn't focus on the legs or back, but on the shapes of the air trapped between the legs or between the back rungs.
- Why It Works: Drawing negative shapes helps you see the subject more objectively. These abstract shapes often lack the preconceived notions we associate with the named object.29 This improves accuracy in proportions, angles, and the placement of elements by forcing you to observe the relationships between forms and the spaces they occupy. It encourages a holistic view of your composition.
- Materials & Time Needed: Pencil, paper, and a subject with interesting negative spaces (like a plant, a chair, or a figure). Practice sessions can be around 10-30 minutes.
- Skill Level & Audience: Great for beginners to intermediate artists, especially those struggling with proportion and accurate observation.
- Effectiveness & Evidence: This is a classic drawing exercise emphasized by many art educators, most notably Betty Edwards in "Drawing on the Right Side of the Brain." It's known for producing surprisingly accurate results and "aha!" moments.
- Caveats & Common Mistakes: It can feel a bit counter-intuitive at first to "draw what's not there." Beginners might struggle to clearly see negative shapes or may find themselves reverting to drawing the positive form. It often helps to squint or simplify your view to identify negative shapes more easily.
- Verification: A well-established art education principle. 29
-
Indent Fine Details (e.g., Whiskers, Light Hairs, Textures)
(Example: OnlineArtLessons.com - Hack #14 -
1
)
- Technique Description: This clever trick involves using a hard, pointed tool to press lines or textures into your drawing paper *before* you apply soft media like graphite or charcoal.1 You could use a mechanical pencil with no lead, an empty ballpoint pen, a stylus, a darning needle, or even a hard-grade pencil (like a 7H or 9H) with firm pressure. When you then shade over the area with your soft medium, it skips over the indented lines, leaving them as crisp, white (or paper-colored) marks.
- Why It Works: The drawing medium (graphite or charcoal) deposits onto the raised surface of the paper but can't easily reach into the compressed, indented grooves. This preserves the original paper color in the indents, creating fine, light lines against the shaded background – perfect for delicate details!
- Materials & Time Needed: Drawing paper (smoother paper often works best for this), an indenting tool, and soft graphite pencils or charcoal. Learning this takes just a few minutes of experimentation.
- Skill Level & Audience: Best for intermediate artists, or adventurous beginners who want to tackle subjects with fine light details like animal whiskers, light hairs, wood grain, or subtle highlights on textured surfaces.
- Effectiveness & Evidence: This technique is described in various online drawing tutorials and books as a fantastic way to achieve delicate highlights.1
-
Caveats & Common Mistakes:
- Permanence: Be aware that indentations are permanent and cannot be erased. It's a good idea to practice on scrap paper first to gauge the pressure and effect.
- Paper Damage: Excessive pressure can tear or weaken your paper, so be gentle but firm.
- Visibility: The indents can be hard to see before you start shading, so it requires a bit of planning.
- Medium Application: Apply your shading medium gently over the indented area to avoid forcing it into the grooves and spoiling the effect.
- Verification: This technique is described in sources like OnlineArtLessons.com. 1
3.3. Fun for All Ages: Hacks for Kids & Classrooms
These hacks are all about making art fun and accessible for children! They prioritize safety, simplicity, low-mess materials, and process-oriented enjoyment. The goal is to get kids engaged and creative without demanding high technical skill, often by using familiar starting points or simple actions that yield wonderfully satisfying results.
-
Symmetrical Blot Painting (Abstract Creatures/Patterns)
(Example: Many early childhood art blogs demonstrate this, e.g., "Butterfly Prints")
- Technique Description: This classic activity involves dropping or squirting a small amount of liquid paint (like tempera or washable acrylics) onto one half of a piece of paper. The paper is then folded in half along a central line, and gentle pressure is applied. When unfolded, a magical, symmetrical abstract design or "blot creature" is revealed!
- Why It Works: It's a fantastic way to introduce the concept of symmetry in a fun, tactile, and almost surprising way that kids love. The element of surprise in the revealed image is highly engaging. It's very process-focused, requiring minimal artistic skill to produce an interesting and often beautiful result.
- Materials & Time Needed: Paper (construction paper or drawing paper works well), liquid washable paints (tempera is ideal), and brushes or droppers (optional, for applying paint). Each painting takes about 5-15 minutes.
- Skill Level & Audience: Perfect for young children (preschool to early elementary). It's an ideal activity for classroom art sessions or fun at home.
- Effectiveness & Evidence: A classic and widely used art activity in early childhood education due to its simplicity, low cost, and highly engaging nature.
- Caveats & Common Mistakes: This one can get a bit messy, so ensure work surfaces are covered and children wear smocks or old clothes. Always use washable paints for easy cleanup! Using too much paint can result in a soggy, undefined blob, so a little goes a long way.
- Verification: This is general art education knowledge, widely available in kids' craft resources and educational blogs.
-
Stencils from Leaves and Found Objects
(Example: Nature-based craft tutorials often feature leaf rubbing/stenciling)
- Technique Description: Gather natural objects like leaves, flat flowers, or even simple cut-out shapes (from cardboard or craft foam) to use as stencils. Children can place the object on paper and paint or color around its edges. Alternatively, they can place paper over a textured object (like a leaf with prominent veins) and rub with the side of a crayon to create a beautiful textured impression – this is called frottage!
- Why It Works: This activity beautifully connects art-making with the natural world and encourages children to observe shapes and textures around them. It's an easy way for them to create recognizable shapes and patterns, fostering a wonderful sense of accomplishment. It’s also great for developing fine motor skills and understanding positive/negative space.
- Materials & Time Needed: Leaves, flat found objects, paper, crayons, paint (tempera or watercolor), and sponges or brushes. The activity usually takes about 10-25 minutes.
- Skill Level & Audience: Ideal for young children (preschool to elementary). It's particularly suitable for classroom nature art projects or outdoor art sessions.
- Effectiveness & Evidence: A common and highly effective technique found in early childhood art education programs and nature craft activities.
- Caveats & Common Mistakes: Ensure the objects chosen are relatively flat and sturdy enough for stenciling or rubbing. It can be helpful to tape down lightweight stencils to prevent them from shifting. For rubbings, thinner paper often works best to pick up the texture.
- Verification: Commonly found in early art education guides and craft websites.
-
Scaffolded "Hack Cards" (Step-by-Step Simple Drawings)
33
- Technique Description: This involves creating or using a set of cards, where each card illustrates a very simple step-by-step process to draw an object, animal, or character. These usually start with basic geometric shapes as the foundation.33 For example, a card set might show how to draw a dog in 4-5 simple stages: start with a circle for the head, add an oval for the body, then rectangles for legs, and finally ears and a tail.
- Why It Works: This method breaks down the drawing process into clear, manageable, and non-intimidating steps, which is absolutely crucial for young learners.33 This "scaffolding" builds confidence by ensuring success at each stage and teaches basic construction principles in an accessible way. It also allows for independent or small-group learning in a classroom setting.
- Materials & Time Needed: You can make DIY cards (using index cards or laminated paper with simple drawings) or purchase step-by-step drawing books/card sets. Standard drawing materials like pencils, crayons, and paper are needed. This can be an ongoing activity used as a learning station.
- Skill Level & Audience: Perfect for young children, typically from Preschool to early elementary ages (around 4-8 years old).
- Effectiveness & Evidence: Many popular "how to draw for kids" books and educational resources use this method (think of Ed Emberley's fantastic books).34 Art teachers often recommend step-by-step guidance with basic shapes for children.33 Engaging character design projects can also be simplified using this fun approach.36
- Caveats & Common Mistakes: While great for getting started, it can lead to formulaic or copied drawings if children aren't encouraged to add their own details, colors, or variations after mastering the basic steps. The goal is to build a foundational understanding of how shapes form objects, not just rote copying.
- Verification: Supported by principles of scaffolded learning and demonstrated in numerous children's art education materials. 33
-
Foil Art Sticker Crafts (Simplified Creative Process)
(Example: Peaceable Kingdom Foil Art -
37)
- Technique Description: This delightful activity usually involves a pre-printed picture with certain sections covered by a peel-off yellow layer. Peeling this layer reveals a sticky surface underneath.37 Children peel a section, take a sheet of colored foil, lay it (sparkly side up!) over the sticky area, press and rub it down, then peel the foil sheet away. The sparkly foil magically adheres only to the exposed sticky section!
- Why It Works: This is a very simple, low-mess process that yields a shiny, visually impressive result with minimal artistic skill required. It focuses on the sensory experience of peeling and pressing, and the satisfying reveal of the colorful foil. It's excellent for developing fine motor skills and color recognition, and kids love the sparkly outcome.
- Materials & Time Needed: These are typically found as commercially available foil art kits, which contain pre-sticky pictures and sheets of foil. The activity usually takes about 10-30 minutes, depending on the complexity of the design.
- Skill Level & Audience: Perfect for young children, generally ages 3-7.
- Effectiveness & Evidence: The sheer existence and popularity of commercial craft kits like these demonstrate their appeal and suitability for young children.37 They are a hit for a reason!
- Caveats & Common Mistakes: This is more of a craft activity than a drawing skill-builder, but it's incredibly valuable for engagement, fine motor practice, and creating a wonderful sense of accomplishment. Just ensure children press the foil firmly enough for good adhesion to the sticky parts.
- Verification: Based on product descriptions and craft activity guides. 37
-
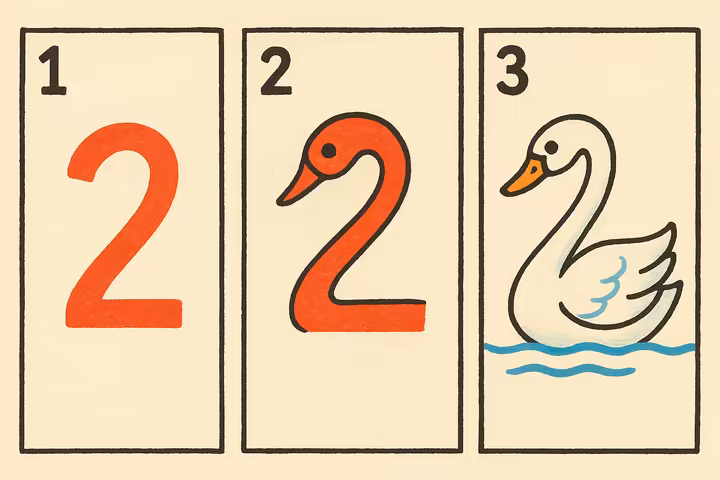
Using Numbers and Letters as Drawing Starters
(Example: How to Draw a Butterfly from the Letter Y -
34
, Drawing animals from numbers -
35
)
- Technique Description: This incredibly fun hack involves transforming a familiar number or letter of the alphabet into a simple drawing of an animal or object. For example, the number '2' can magically turn into a swan, the letter 'Y' can form the basis of a butterfly's wings, or a 'B' can become a pair of glasses!34
- Why It Works: It provides a recognizable and completely non-intimidating starting point for a drawing. Children are already familiar with letters and numbers, which makes that initial step feel super easy and achievable. It cleverly demonstrates how simple, known shapes can be combined and modified to create more complex images, fostering creativity and visual problem-solving skills.
- Materials & Time Needed: All you need is a pencil, crayon, or marker, and some paper. Each little drawing can be completed in just 2-10 minutes.
- Skill Level & Audience: Perfect for young children, particularly those in early elementary grades (Kindergarten to Grade 2).
- Effectiveness & Evidence: This is a very popular and widely shared technique in "how to draw for kids" books, websites, and video tutorials.34 It's a tried-and-true favorite!
- Caveats & Common Mistakes: While incredibly fun and engaging, over-reliance on this method without encouraging further free-form drawing could be somewhat limiting to broader creative expression. It's great to encourage children to invent their own letter and number transformations once they get the hang of it! Also, remember those eco-friendly cleanup hacks, like using old bedsheets as drop cloths or repurposing produce trays as paint palettes, are super relevant for classroom settings to manage mess effectively and sustainably.38
- Verification: Commonly found in educational drawing resources for children. 34
3.4. Creating Depth: Perspective & 3D Illusion Hacks
Perspective can be one of the trickiest fundamental skills for beginners to get their heads around. These hacks are designed to simplify the principles of creating depth and volume on a flat page, offering procedural shortcuts to achieve convincing three-dimensional illusions. Let's make 3D easy!
-
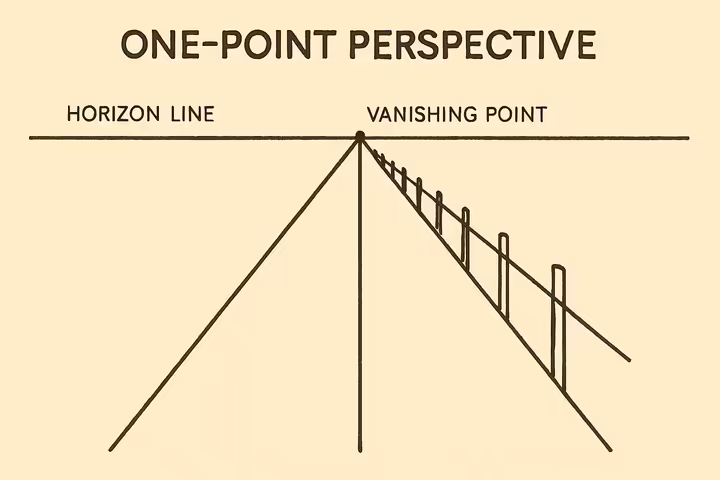
One-Point Perspective Shortcuts (e.g., "Railroad Tracks" or "Road to Horizon" Method)
(Example: Stan Prokopenko - Perspective Basics -
https://www.proko.com/course-lesson/perspective-basics/notes
- often covers this)
- Technique Description: This hack starts by establishing a horizontal line (the horizon line, which represents your eye level) and a single vanishing point (VP) on that line. All parallel lines that recede from you, the viewer (these are called orthogonals), are then drawn to converge at this single VP.29 This is commonly used to depict scenes like roads vanishing into the distance, railway tracks, long hallways, or the interiors of rooms when viewed straight-on.
- Why It Works: It brilliantly simplifies the complex rules of linear perspective into an easy-to-apply formula. This creates a convincing illusion of depth on a two-dimensional surface. Objects appear smaller and lines converge as they move further away towards the vanishing point, perfectly mimicking how we perceive depth in the real world.
- Materials & Time Needed: You'll need a pencil, paper, and a ruler (optional, but very helpful for getting those straight lines). Learning the basic concept can take about 10-30 minutes, with practice improving your application over time.
- Skill Level & Audience: Ideal for beginners who are just starting to learn the fundamentals of perspective drawing.
- Effectiveness & Evidence: This is a foundational concept taught in virtually all introductory drawing and art classes.29 You'll find numerous art instruction books and online tutorials explaining this essential method.
- Caveats & Common Mistakes: This method is best for scenes where major receding lines are parallel to each other and perpendicular to your line of sight (or parallel to the sides of your picture plane). Incorrect placement of the horizon line or the vanishing point can lead to some wonky distortions. Also, objects not aligned with the main receding direction won't conform to this single VP.
- Verification: This is a standard art instruction principle. 29
-
Two-Point Perspective Shortcuts (e.g., Drawing a Box Corner First)
(Example: ProkoTV TikTok on 2-Point Perspective -
39
)
- Technique Description: This method kicks off by establishing a horizon line and two vanishing points (VPs), which are typically placed towards the edges of your paper, or sometimes even off the paper entirely. To draw an object (like a box, building, or book), you start with its leading vertical edge.29 Lines are then extended from the top and bottom of this vertical edge towards both vanishing points. Subsequent vertical lines are drawn between these converging orthogonals to define the object's sides.
- Why It Works: It provides a structured and reliable way to depict objects that are viewed at an angle. In this scenario, two sets of their parallel lines recede to two different points on the horizon line.39 This creates a more dynamic and commonly seen three-dimensional illusion compared to one-point perspective.
- Materials & Time Needed: Pencil, paper, and a ruler (highly recommended for accuracy with this one!). Learning the setup can take about 20-40 minutes, plus ongoing practice to get comfortable with it.
- Skill Level & Audience: Great for beginners to intermediate artists who are ready to move beyond one-point perspective and tackle more complex scenes.
- Effectiveness & Evidence: This is a standard and essential method for teaching two-point perspective in art and design education.29 It's a skill you'll use again and again.
- Caveats & Common Mistakes: Placing your vanishing points too close together on the paper can cause extreme distortion, making objects look overly stretched or warped – give them some space! Also, remember that vertical lines must remain strictly vertical (unless you're intentionally aiming for three-point perspective). Consistent use of your VPs is absolutely crucial for a convincing result.
- Verification: This is a core perspective drawing technique. 29
-
Drop Shadow Techniques for Instant 3D
(Example: Basic graphic design tutorials often show this)
- Technique Description: This is a super quick win! It involves adding a simple shadow beneath and slightly to one side of an object, as if it's resting on or hovering just above a surface. The shape of the drop shadow often mimics the base of the object, and its direction and length are determined by an implied light source.
- Why It Works: Our brains are wired to readily interpret shadows as indicators of an object's form, its position relative to a surface, and the direction of light. A well-placed drop shadow can make an otherwise flat object appear to lift right off the page or possess real volume and weight.
- Materials & Time Needed: Pencil, marker, or digital drawing tools, and paper. You can learn and apply this in just a few minutes!
- Skill Level & Audience: Perfect for beginners looking for a speedy way to add dimensionality to their drawings.
- Effectiveness & Evidence: Commonly used in graphic design, illustration, and even simple cartooning to quickly create a 3D effect. It's a simple trick with big impact.
- Caveats & Common Mistakes: For the shadow to be convincing, it must be consistent with an implied light source in terms of direction, shape, and softness/hardness. Overly dark or awkwardly shaped shadows can look unnatural and spoil the illusion.
- Verification: A general art and design principle, easily found in basic shading and illustration tutorials.
-
Anamorphic Drawing (Simple Illusions)
(Example: Search "3D Hand Drawing Illusion Tutorial" on YouTube)
- Technique Description: Anamorphic drawing is all about creating a distorted image on a flat surface that magically appears three-dimensional and undistorted when viewed from a very specific angle or through a camera lens. Simple versions often involve drawing elongated shapes or using a specific grid that is then "corrected" by the viewing angle. A popular example you might have seen is the "3D hand drawing" where parallel lines are drawn across a hand outline, with the lines bulging outward where the hand is, creating an amazing illusion of the hand rising from the page!
- Why It Works: This technique cleverly plays on our visual perception and the principles of forced perspective. The distortion is precisely calculated (or intuitively achieved in simpler versions) so that when seen from the correct vantage point, the image resolves into a coherent and often startling 3D illusion.
- Materials & Time Needed: Pencil, paper, and often a ruler or a pre-drawn grid. Time can range from about 30 minutes for simple illusions to many, many hours for complex anamorphic artworks.
- Skill Level & Audience: Simple versions can be attempted by adventurous beginners and children – they're great fun! More complex anamorphic art, however, is definitely in the intermediate to advanced range.
- Effectiveness & Evidence: These are extremely popular online, with many viral videos and tutorials showcasing incredible 3D illusions created right on paper.
- Caveats & Common Mistakes: The 3D effect is usually highly dependent on a single, specific viewpoint; from other angles, the drawing will just look distorted. It requires careful planning and precise execution for convincingly mind-bending results. Shading is often crucial to enhance the illusion and make it pop.
- Verification: Numerous tutorials are readily available on platforms like YouTube and TikTok.
-
Method for Division and Duplication in Perspective
(Example: Circle Line Art School - 5 EASY HACKS To Create BETTER Drawings (In Perspective) -
40
, content likely from this video)
- Technique Description: This is a geometric method used to accurately divide planes or duplicate shapes (like rectangles representing windows, tiles, or the spaces between posts) as they recede into the distance in a perspective drawing. A common technique involves finding the midpoint of a receding plane by drawing diagonals from corner to corner; their intersection marks the center.40 To duplicate a shape in perspective, lines are often extended from existing corners through midpoints of sides to precisely determine the far edge of the next identical, foreshortened shape.
- Why It Works: It applies consistent geometric principles to the tricky problem of foreshortening. This ensures that objects decrease in apparent size at a proportionally correct rate as they move further away.40 This is much more accurate and reliable than trying to eyeball such divisions or duplications.
- Materials & Time Needed: Pencil, paper, and a ruler (which is essential for accuracy here). Understanding and applying the method can take about 15-30 minutes of focused learning.
- Skill Level & Audience: Best for intermediate artists, or beginners who are serious about mastering accurate perspective and want to add precision to their scenes.
- Effectiveness & Evidence: This is a recognized and respected technique in technical perspective drawing, often taught in architectural drawing and advanced illustration courses.40
- Caveats & Common Mistakes: This method requires precise drawing of your construction lines. Any errors in finding midpoints or drawing diagonals will lead to inaccuracies in the divisions or duplications. It can also become quite complex when working with multi-point perspective.
- Verification: Described in many perspective drawing tutorials and guides. 40
3.5. Finding Your Style: Genre-Specific Hacks (Anime, Comics, etc.)
These hacks offer streamlined processes or shortcuts for achieving the characteristic aesthetics of popular drawing styles. They often involve breaking down visual conventions into learnable steps or leveraging tools that are particularly well-suited to that specific style. Let's dive into how to capture those unique looks!
3.5.1. Anime & Manga Magic
-
Simplified Eye/Hair Formulas
(Example: TheBeginnerDrawingCourse.com - 10 Easy Anime Drawing Tips -
30
)
- Technique Description: This involves using established step-by-step formulas, templates, or common construction methods for drawing those archetypal anime/manga eye shapes and dynamic, stylized hair. It often means following specific sequences of lines and shapes to achieve the large, expressive eyes and voluminous, often gravity-defying, hair that are hallmarks of the style.30
- Why It Works: Anime and manga art styles lean heavily on recognizable visual conventions and character archetypes. These formulas provide a quick and accessible way to replicate the distinctive look and feel of the genre,30 especially for features like eyes and hair that are highly stylized and absolutely central to character expression.
- Materials & Time Needed: Pencil and paper, or your favorite digital drawing tools. You'll also want access to reference guides or tutorials (plenty online!). Practicing a specific eye or hairstyle formula might take around 10-30 minutes to get the hang of.
- Skill Level & Audience: Perfect for beginners to intermediate artists who are fans of the anime/manga style and want to learn its conventions.
- Effectiveness & Evidence: These formulas are abundantly available in online tutorials (YouTube, Pinterest, DeviantArt), "how to draw manga" books, and dedicated courses.30 Visual shorthand like sweat drops or snot bubbles are also part of this rich stylistic language.41
- Caveats & Common Mistakes: Over-reliance on rigid formulas without understanding the underlying structure or principles of variation can lead to generic, "cookie-cutter" characters. Once you grasp the basics, try to personalize and adapt the formulas to create your own unique characters!
- Verification: Numerous sources confirm these stylistic conventions and teaching methods. 30
-
Expression Guides (Anime Emotion Charts)
(Example: Adobe - How to Draw Manga & Anime -
41
)
- Technique Description: This involves using reference charts or guides that illustrate how to depict common emotions (like happiness, sadness, anger, surprise, embarrassment) using conventional anime/manga facial features. These guides typically show variations in eye shape, eyebrow position, mouth shape, and the addition of stylistic symbols like pop veins for anger, blush lines for shyness, or sweat drops for anxiety or exasperation.30
- Why It Works: It provides a handy visual library of the established "emotional shorthand" within the anime/manga aesthetic. This enables artists to quickly and effectively convey a character's feelings in a way that is readily understood and appreciated by fans of the style.41
- Materials & Time Needed: Access to expression charts (you can find these online or in books), and your usual drawing tools. These are used as an ongoing reference while you're drawing characters.
- Skill Level & Audience: Very useful for beginners to intermediate anime/manga artists looking to master expressive characters.
- Effectiveness & Evidence: These are a common feature in manga drawing instruction materials and countless online resources.41
- Caveats & Common Mistakes: It's a good idea to encourage artists to also observe real human expressions to avoid overly stereotyped or limited emotional portrayals. Think of these guides as a fantastic starting point, not an exhaustive list of every possible emotion.
- Verification: This is a standard component of anime/manga drawing education. 30
-
Digital Layering Workflow for Anime Lineart & Coloring
(Example: Reddit r/learnart discussion -
42
)
-
Technique Description:
A common digital workflow for creating awesome anime-style illustrations often goes like this:
- Sketch your initial design on one layer – keep it loose!
- Create clean, refined line art on a new layer above the sketch. This is where precision counts.
- Make a "shape layer" or "selection layer" by coloring in the entire character silhouette on a layer beneath the line art. This layer is super helpful for easily creating selections or clipping masks for individual parts later.
- Use separate layers (often clipped to that shape layer) for the flat base colors of different elements (like skin, hair, clothes).
- Add a new layer, set its mode to "Multiply" (and clip it to your base colors), for painting in shadows.
- Add another layer, set to "Overlay," "Add (Glow)," or "Screen" mode, for painting in those shiny highlights.42
- Why It Works: This layered approach is a game-changer for digital anime illustration, offering amazing flexibility and control. It allows for non-destructive editing (meaning you can make changes to one layer without messing up others), efficient coloring using clipping masks, and easy adjustment of shadows and highlights using layer modes and opacity.
- Materials & Time Needed: You'll need digital drawing software (like Clip Studio Paint, Procreate, Photoshop, or Paint Tool SAI) and a graphics tablet or display. The time it takes will vary hugely with the complexity of your illustration.
- Skill Level & Audience: Aimed at digital artists who are focusing on the anime/manga style and want an efficient workflow.
- Effectiveness & Evidence: This is a widely shared and highly recommended workflow among digital anime artists in online communities and tutorials.42 It's a proven method!
- Caveats & Common Mistakes: It requires a good understanding of your chosen software's layer functions, blending modes, and selection tools. Managing a large number of layers can also become confusing if you don't keep them organized (e.g., by naming your layers clearly!).
- Verification: This is common practice discussed in many digital art forums. 42
-
Technique Description:
A common digital workflow for creating awesome anime-style illustrations often goes like this:
3.5.2. Comic Art & Inking Shortcuts
-
Panel Speed Tips (Thumbnailing, Simple Shapes First)
(Example: Matthew Childers - Drawing Tips -
43
)
-
Technique Description:
To seriously boost your speed and efficiency when creating comic pages, try these pro tips:
- Thumbnailing: Always start by creating very small, quick sketches (thumbnails) of entire pages or sequences of panels. This helps you plan out composition, flow, character placement, and storytelling beats *before* you commit to larger, more detailed drawings.43
- Scribble/Simple Shapes: Once you've chosen a thumbnail you like, move to the larger page layout. But begin by loosely scribbling in the action and using basic shapes and silhouettes to block in characters and environments. Focus on energy and movement first, rather than getting bogged down in precise construction lines.43
- Why It Works: Thumbnailing allows for rapid iteration and problem-solving at the compositional stage, which is when changes are super easy and quick to make. This saves a huge amount of time compared to making major changes on a detailed, full-size page.43 Starting your layouts with energetic scribbles and basic shapes helps maintain that energy and quickly establish the core elements of each panel before you get lost in the details.
- Materials & Time Needed: Pencil and paper (or your digital equivalents). Thumbnailing can take just a few minutes per page, while rough layouts will vary depending on complexity.
- Skill Level & Audience: Essential for aspiring and professional comic artists alike.
- Effectiveness & Evidence: This is a standard and highly recommended part of the professional comic creation workflow. Experienced comic artists emphasize it for both efficiency and better storytelling.43
- Caveats & Common Mistakes: It requires discipline not to add too much detail during the thumbnail stage – keep them rough and focused! Thumbnails should be all about clarity of composition and flow, not finished art. Moving from those energetic scribbles to more structured forms takes practice, but it's worth it.
- Verification: Advocated by many comic art instructors and professionals. 43
-
Technique Description:
To seriously boost your speed and efficiency when creating comic pages, try these pro tips:
-
Line Art Shortcuts (Varying Line Weight, Strategic Tool Choice)
(Example: General inking tutorials, e.g., David Finch - Dynamic Inking -
https://www.youtube.com/watch?v=PoTYYq2Ld2A
- illustrative of type of content)
-
Technique Description:
- Line Weight Variation: This is all about intentionally varying the thickness of your inked lines to create visual interest, depth, and emphasis. General rules include using thicker lines for objects closer to the viewer, for the outlines of forms, or to emphasize areas that are in shadow. Thinner lines are typically used for details, textures, distant objects, or areas in bright light.
- Tool Choice: Strategically select inking tools (pens, brushes, or their digital equivalents) that best suit the desired style and your efficiency. For example, technical pens (like Microns) are great for consistent, clean lines, while brush pens or traditional brushes excel at creating expressive, dynamic lines with significant weight variation.
- Why It Works: Purposeful line weight variation is a key element of traditional comic book inking that guides the viewer's eye, enhances the illusion of three-dimensionality, and adds a real touch of professional polish. Choosing the right tool can also significantly impact both the speed and the character of your line art.
- Materials & Time Needed: You'll need inking pens (e.g., fineliners, dip pens, brush pens), ink, paper suitable for inking (like Bristol board), or digital inking software and a stylus. This is an ongoing skill that develops with practice.
- Skill Level & Audience: Best for intermediate to advanced artists who are focusing on developing their inking skills.
- Effectiveness & Evidence: These are fundamental techniques in comic art and illustration. Numerous books and tutorials cover line weight theory and tool usage in great detail.
- Caveats & Common Mistakes: Achieving consistent and purposeful line weight variation takes considerable practice – don't get discouraged! Beginners may struggle with controlling ink flow or creating smooth tapers with brush pens. Inconsistent line weight can make a drawing look messy or confusing, so aim for deliberate choices.
- Verification: These are core principles of inking taught in comic art education.
-
Technique Description:
3.5.3. Realistic Portrait Perfection
-
Grid Method Variations for Accuracy (Example: ArtGraphica - Learn to Draw with a Grid - 23)
- Technique Description: This classic technique involves drawing a grid of uniform squares over your reference photograph. You then draw a corresponding, often larger, grid (with the same number of squares) lightly on your drawing paper.9 The artist then meticulously copies the lines, shapes, and values from each square of the reference photo into the corresponding square on their drawing paper. Variations include the "squiggle grid" or "doodle grid" method, sometimes used for upscaling artwork for murals, where irregular lines and shapes are drawn on both the wall and the reference, then matched up.45
- Why It Works: The grid breaks down the incredibly complex task of drawing a realistic portrait into smaller, much more manageable sections. This allows you to focus on the abstract relationships of lines and shapes within each individual square, rather than being overwhelmed by the entire face.9 This leads to significantly improved proportional accuracy and feature placement, helping you to "see" more accurately.
- Materials & Time Needed: A reference photograph, pencil, paper, and a ruler (for drawing the grid). The process can be time-consuming, ranging from 1-2 hours for a simple gridded sketch to many hours for a highly detailed, rendered portrait. Online tools like gridtoolonline.com can help create the grid on your photo digitally.27
- Skill Level & Audience: Fantastic for beginners to intermediate artists who are seeking high accuracy in their portraits. It's particularly helpful for those struggling with achieving a likeness.
- Effectiveness & Evidence: This is a widely taught and utilized method for achieving realistic drawings, especially in portraiture.23 Art educators often note that it gives students a real confidence boost by enabling them to produce work they are genuinely proud of.27
-
Caveats & Common Mistakes:
- Becoming a Crutch: Over-reliance on the grid without also practicing freehand observation can hinder the development of your inherent observational and proportional judgment skills.23 Use it as a tool, not a permanent fixture.
- Visible Grid Lines: Grid lines on your drawing paper must be drawn very lightly with a hard pencil (like a 2H) so they can be easily erased or will fade into your shading. Alternatively, you can use underlay methods or transfer techniques to avoid having lines on your final paper.27
- Mechanical Look: Drawings can sometimes look a bit stiff or "copied" if the artist focuses too much on replicating each square without considering the overall form and flow of the features. Try to see the bigger picture as well!
- Verification: Multiple sources confirm its use and effectiveness.9
-
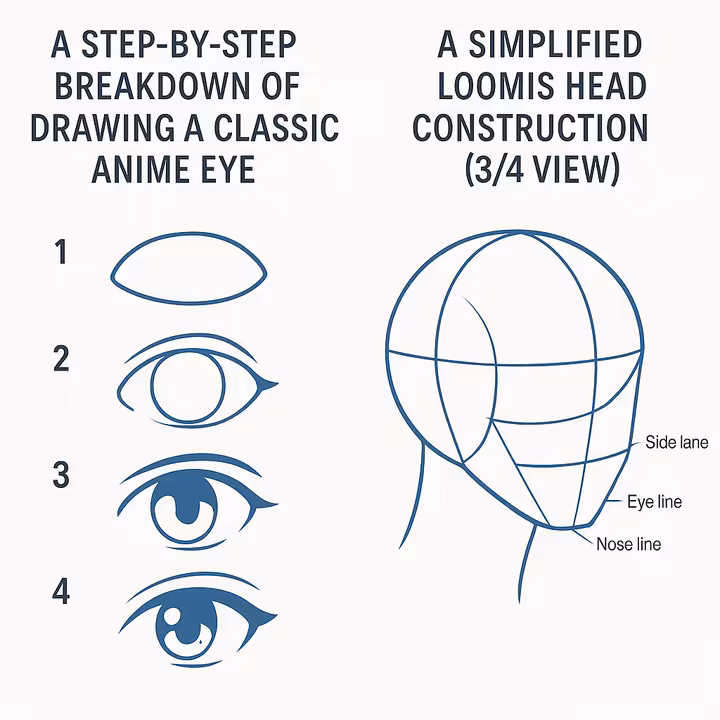
Feature Placement Guides (e.g., Simplified Loomis Head, Basic Proportional Rules) (Example: 21-Draw - Loomis Method - 47)
- Technique Description: This involves using simplified versions of head construction methods, such as the famous Loomis method, or applying basic rules of thumb for facial proportions to guide the placement of features. The Loomis method typically starts with a sphere or ball, with a cross-section notionally removed from the sides. It then uses a series of intersecting lines (brow line, nose line, centerline) to map out the planes of the head and the location of features like eyes, nose, and mouth.47 Simplified rules include handy guides like "eyes are halfway down the head," "the space between the eyes is roughly one eye-width," or "the bottom of the nose is about halfway between the brow line and the chin."
- Why It Works: These methods provide a solid structural framework for understanding the three-dimensional form of the head and the relative positions of facial features. This helps you place them correctly in relation to each other and in perspective.47 This is more about constructing the head from understanding its form, rather than direct copying.
- Materials & Time Needed: Just a pencil and paper! Learning the basic Loomis head construction or general proportional rules can take about 30 minutes to an hour, with ongoing practice needed to master it from different angles.
- Skill Level & Audience: Excellent for beginners to intermediate artists who are learning portraiture and head construction.
- Effectiveness & Evidence: The Loomis method, developed by the brilliant illustrator Andrew Loomis, is a well-known and highly respected approach for drawing heads and figures.47 Basic proportional guidelines are standard in introductory portrait drawing classes. Some artists find that the Loomis method results in more organic and less "lifeless" drawings compared to relying solely on the grid method.48
- Caveats & Common Mistakes: Remember that simplified proportional rules are generalities and must be adjusted for individual variations in facial features, age, ethnicity, and expression – everyone is unique! The Loomis method itself requires practice to understand and apply correctly from different angles. Think of it as a tool for understanding structure, not a rigid template to be followed blindly.
- Verification: The Loomis method is widely taught47, and its comparison to the grid method is often discussed by artists.48
3.6. Smart Supplies: Tool, Medium, & Material Hacks
This category is all about smart uses of tools, ingenious modifications of materials, or DIY solutions that can really enhance your drawing process. Often, these hacks emphasize economy, efficiency, creating unique effects, or even sustainability. Get ready to get resourceful!
3.6.1. Old-School Cool: Traditional Media Hacks
-
DIY Blending Stumps (Tortillons from Rolled Paper) (Example: OnlineArtLessons.com - Hack #5 (Draw Using a Cloth) is related,9 mentions tortillons - 1)
- Technique Description: You can create your own handy blending tool by tightly rolling a piece of paper (newsprint, soft drawing paper, or even regular printer paper works) into a cylindrical shape. Often, you'll want to taper it to a point at one or both ends. This DIY stump is then used to smudge and blend graphite, charcoal, or pastel, just like a store-bought one!
- Why It Works: The rolled paper provides a firm yet slightly yielding surface that can effectively pick up and redistribute pigment particles. This softens lines and creates smooth tonal transitions, very similar to commercial tortillons or stumps. It's a wonderfully economical alternative, and you can make one whenever you need it.
- Materials & Time Needed: Paper (newsprint, sketch paper, etc.), and scissors or a craft knife (optional, for shaping the point). Making one takes just 5-10 minutes.
- Skill Level & Audience: Suitable for all skill levels, especially those on a budget or anyone who suddenly finds themselves in need of a quick blending tool.
- Effectiveness & Evidence: This is a common and well-loved DIY art tool hack. While specific snippets might describe using a cloth1 or manufactured tortillons9, the principle of a paper-based blending tool is well-established in the art community.
- Caveats & Common Mistakes: DIY stumps may not be quite as durable or offer the same range of hardness/softness as commercially produced ones. The tip can wear down or become overly saturated with pigment fairly quickly. Don't worry, though – they can be "cleaned" by rubbing them on scrap paper or gently sanded with fine sandpaper to refresh the point.
- Verification: Implied by the commonality of tortillons (which are essentially rolled paper)9 and general DIY art practices seen in many art communities.
-
Pencil Extenders (to Utilize Short Pencil Stubs) (Example: OnlineArtLessons.com - Hack #4 - 1)
- Technique Description: A pencil extender is a small, sleeve-like holder, usually made of metal or plastic. It has a mechanism (like a sliding ring or a screw clamp) to firmly grip a short pencil stub.1 This clever device allows you to comfortably hold and use your favorite pencils until very little of them remains.
- Why It Works: It effectively lengthens the pencil, providing a comfortable and familiar grip for pencils that have become too short to hold normally. This simple hack maximizes the usable life of each pencil, which reduces waste and can save you a good bit of money in the long run!1
- Materials & Time Needed: A pencil extender (these are purchased but generally inexpensive). Using it takes only a few seconds – just pop your pencil stub in!
- Skill Level & Audience: Useful for all skill levels, particularly for artists who use traditional pencils frequently and want to get the most out of every single one.
- Effectiveness & Evidence: This is a highly practical and economical tool that's recommended in various drawing guides and by many artists.1 It's a small investment that pays off.
- Caveats & Common Mistakes: Make sure the extender you choose is compatible with the diameter of the pencils you typically use (most are fairly standard, but some specialty pencils might differ). Some extenders may alter the balance of the pencil slightly, but most artists adapt quickly.
- Verification: Multiple sources advocate for their use as a smart, waste-reducing tool.1
-
Kneaded Erasers for Subtractive Drawing and Highlights (Example: Sky Rye Design - Use Erasers for Highlights - 9)
- Technique Description: A kneaded eraser (that soft, pliable eraser that feels a bit like putty) is used not just for fixing mistakes, but actively for "drawing" by lifting pigment (like graphite, charcoal, or pastel) from the paper. You can mold it into different shapes: a fine point for creating sharp highlights, a thin edge for making linear marks, or you can dab or roll it to gently lighten larger areas or soften sketch lines.1
- Why It Works: Kneaded erasers lift pigment by adhesion rather than abrasion. This means they are much less likely to damage the paper surface compared to harder erasers.9 Their amazing malleability allows for precise control over the shape and size of the area being lifted, enabling artists to create a wide range of subtractive marks and subtle tonal adjustments. They're like a sculptor's tool for pencil drawings!
- Materials & Time Needed: A kneaded eraser and a drawing made with dry media. Application is immediate – just shape and lift!
- Skill Level & Audience: A versatile tool for all skill levels. Everyone can benefit from its unique properties.
- Effectiveness & Evidence: This is a standard and incredibly versatile tool in any traditional artist's kit. It's frequently highlighted for its fantastic subtractive drawing capabilities.1
- Caveats & Common Mistakes: The eraser absorbs pigment as you use it, so it needs to be "cleaned" periodically by stretching and folding it to expose a fresh surface. It's not as effective for completely erasing very dark or heavily applied marks as a vinyl or rubber eraser might be; it's more for subtle lifting and shaping.
- Verification: Widely recommended and demonstrated in countless art tutorials and classes.1
-
Cheap Marker Blending Tricks (e.g., Colorless Blender, Rubbing Alcohol) (Example: Search "alcohol marker blending hacks" on YouTube)
-
Technique Description: Here are a couple of ways to get smoother blends with markers, especially alcohol-based ones:
- Colorless Blender Marker: Most alcohol marker sets come with a colorless blender pen. This pen contains the same alcohol-based solvent as your colored markers but has no pigment. It's used to push ink around on the paper, lighten areas, help fix small mistakes, or create smoother blends between colors.
- Rubbing Alcohol: For some types of markers (primarily alcohol-based), a cotton swab or a small brush lightly dipped in rubbing alcohol (isopropyl alcohol) can be used to reactivate the ink on the paper. This allows colors to be blended or softened even after they've dried a bit.
- Why It Works: The solvent in the colorless blender or the rubbing alcohol temporarily dissolves and mobilizes the dried marker ink on the paper. This allows adjacent colors to merge more smoothly or enables the pigment to be spread more thinly for lighter tones or subtle transitions.
- Materials & Time Needed: Alcohol-based markers, a colorless blender marker (often included with sets), rubbing alcohol (90%+ isopropyl is usually recommended), cotton swabs or small synthetic brushes, and marker paper (smooth, coated paper works best to prevent excessive bleeding). Learning these tricks takes just a few minutes of experimentation.
- Skill Level & Audience: Great for hobbyists, students, and illustrators who enjoy working with alcohol markers and want to achieve smoother results.
- Effectiveness & Evidence: These are common and popular tips shared within marker art communities and online tutorials.
-
Caveats & Common Mistakes:
- Paper Saturation: Be careful not to use too much solvent (from either the blender or rubbing alcohol). This can cause the ink to bleed excessively, feather outside your lines, or even damage the paper. Work quickly and lightly!
- Marker Type: Rubbing alcohol primarily works with alcohol-based markers. It may not be effective or could even damage water-based or solvent-based (non-alcohol) markers. Always test on a scrap piece of paper first!
- Fading: Excessive use of a colorless blender can sometimes fade your colors more than you intended, so use it judiciously.
- Verification: These are popular techniques demonstrated in numerous online marker art tutorials and communities.
-
Technique Description: Here are a couple of ways to get smoother blends with markers, especially alcohol-based ones:
-
Scotch Tape or Artist's Masking Tape for Neat Borders (Example: OnlineArtLessons.com - Hack #1 - 1)
- Technique Description: This simple hack involves applying low-tack tape (like Scotch brand "Magic" tape, washi tape, or ideally, artist's masking tape) around the edges of your drawing paper before you start working. Once your drawing or painting is complete and fully dry, you carefully peel away the tape to reveal crisp, clean, and perfectly straight borders.1 A hairdryer can sometimes be used to gently warm the tape, making removal even easier and reducing the risk of tearing the paper, especially on delicate surfaces.1
- Why It Works: The tape acts as a physical barrier, preventing any pigment from reaching the masked-off edges of the paper. This creates a professional-looking, sharply defined boundary for your artwork, which can significantly enhance its overall presentation.1
- Materials & Time Needed: Low-tack tape, your drawing paper, and a hairdryer (optional). Applying and removing the tape takes just a few minutes but makes a big difference.
- Skill Level & Audience: Suitable for all skill levels – anyone can achieve neat edges with this trick!
- Effectiveness & Evidence: A widely used and highly effective hack for achieving clean, professional edges in both drawing and painting.1
-
Caveats & Common Mistakes:
- Tape Adhesion: Be careful not to use tape with too strong an adhesive (like regular household masking tape or packing tape), as this can tear the surface of your paper upon removal. Always opt for low-tack artist's tape or test a small piece in an inconspicuous area first.
- Paint Seepage: Ensure the tape is pressed down firmly along its edge to prevent paint or wet media from seeping underneath and spoiling your clean line.
- Removal: Peel the tape away slowly, at an angle away from your artwork, to minimize the risk of tearing the paper. Removing it while paint is still wet can cause smearing, so patience is key!
- Verification: Corroborated by multiple art tutorial sources.1
-
Hairspray as a Fixative (Disputed)
- Technique Description: This involves lightly spraying a fine mist of ordinary aerosol hairspray over a finished charcoal, pastel, or pencil drawing from a distance. The idea is that it acts as a makeshift fixative, intended to prevent smudging.
- Why It Works (Theory): The theory is that the polymers (resins) in hairspray create a thin, clear film over the loose particles of the drawing medium, helping to bind them to the paper surface.
- Materials & Time Needed: Aerosol hairspray (typically an inexpensive brand is used for this) and your finished drawing. Application takes just a few seconds.
- Skill Level & Audience: Often tried by hobbyists or students looking for a readily available and cheap alternative to professional art fixatives.
- Effectiveness & Evidence: This is a very commonly suggested DIY hack, passed down through informal art circles and online forums for decades. Some users report acceptable short-term results, especially for practice pieces or sketches not intended for longevity.
-
Caveats & Common Mistakes:
- Highly Disputed & Not Archival: This is the biggest concern. Hairspray is not designed for art conservation. It often contains acids, perfumes, oils, and other chemicals that can cause the paper to yellow, become brittle, or the drawing to discolor significantly over time. It's not lightfast and can degrade your artwork.
- Uneven Application: It's very difficult to achieve an even coat with a standard hairspray nozzle. This can lead to spotting, splotches, or areas that get too wet, causing the drawing medium to run or darken unpredictably.
- Stickiness: Some hairsprays can leave a noticeable sticky residue on the artwork, attracting dust.
- Damage to Medium: The force of the spray or the chemical composition can sometimes alter the appearance of delicate media like soft pastels, causing them to look flat or matted.
- Professional Recommendation: For any artwork you intend to last or display, professional-grade, acid-free, archival fixative (either workable or final) is strongly recommended by art material experts and conservators. It's worth the investment for art you care about.
Warning: The Hairspray Hack Debate: While using hairspray as a cheap fixative is a popular old-school tip, most art professionals strongly advise against it for any artwork you want to preserve. Hairspray can yellow, become sticky, and damage your paper and drawing over time. For lasting results, always opt for a proper archival art fixative. - Verification: This is a classic "disputed hack." Arguments for its use usually center on its low cost and immediate availability. However, arguments against (which are generally much stronger from an art conservation perspective) focus on its detrimental long-term effects on the artwork and paper. Many professional artists and educators strongly advise against it for any serious work.
3.6.2. Pixel Power: Digital Media Hacks
-
Procreate's QuickShape & Drawing Assist
(Example: Procreate.courses - Procreate Tips -
6
)
-
Technique Description:
- QuickShape: In the amazing Procreate app for iPad, after you draw a line, arc, or a shape (like a circle, rectangle, triangle, or polygon) with your Apple Pencil or even a finger, just hold your stylus or finger down on the screen for a moment. Procreate will magically "snap" the element you just drew into a more perfect, geometrically regular version of that shape!6 You'll then see further options to refine it (e.g., edit shape, choose a perfect circle/square).
- Drawing Assist: This fantastic feature works hand-in-hand with Procreate's Drawing Guides (which include 2D Grid, Isometric, Perspective, and Symmetry). When you turn Drawing Assist on for a layer, any strokes you make on that layer will automatically conform to the active guide.6 For example, with a 2D Grid and Drawing Assist active, your lines will snap to be perfectly horizontal or vertical. With Symmetry Assist, your strokes are instantly mirrored across the chosen axis!
- Why It Works: These features cleverly leverage the iPad's processing power and Procreate's sophisticated algorithms to interpret what you're trying to do. They automatically correct or constrain your strokes to achieve geometric precision or perfect symmetry.6 This saves a considerable amount of time and effort compared to manually trying to draw perfect shapes or symmetrical designs freehand or with traditional tools.
- Materials & Time Needed: An iPad that's compatible with Procreate, the Procreate app itself, and an Apple Pencil (highly recommended for the best experience). Using these features takes only seconds once you know they're there!
- Skill Level & Audience: Beneficial for all levels of digital artists using Procreate, from beginners who need a little help with clean lines to professionals looking for maximum efficiency.
- Effectiveness & Evidence: QuickShape and Drawing Assist are key, heavily promoted, and widely beloved features of Procreate. They are praised everywhere for their incredible utility and ease of use.6 Psst... the liquify tool, set to "edge," can also be a sneaky way to refine wonky lines non-destructively!51
- Caveats & Common Mistakes: Over-reliance on these tools for every single element can sometimes lead to an overly "digital," mechanical, or sterile look if not balanced with some freehand strokes and organic variation. It's important to get comfortable with toggling Drawing Assist on and off for specific layers or parts of your drawing as needed.
- Verification: These are core features documented in Procreate's official handbook and countless third-party tutorials.6
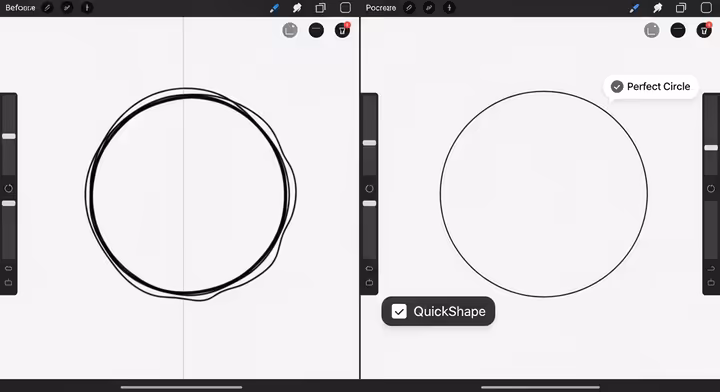
-
Technique Description:
-
Symmetry Tools (in Various Digital Art Software)
(Example: Procreate's Symmetry Guide under Drawing Assist -
6
)
- Technique Description: Most major digital art programs (like Procreate, Photoshop, Clip Studio Paint, Krita, and many others) offer a fantastic symmetry tool or guide. When you activate it, you can choose an axis (or even multiple axes: vertical, horizontal, radial for mandalas, etc.). Then, any stroke you make on one side of the axis is automatically mirrored in real-time on the other side(s) – it's like magic!
- Why It Works: This feature automates the often complex and time-consuming process of creating perfectly symmetrical designs, patterns, or character features (like faces). It ensures exact mirroring, which is incredibly difficult and tedious to achieve perfectly freehand. It's a massive time-saver for certain tasks.
- Materials & Time Needed: Digital drawing software that includes a symmetry feature, and a graphics tablet or display. Using the tool is immediate once you've activated it and set your axis.
- Skill Level & Audience: A gift for digital artists of all levels! It's particularly useful for concept art, character design (especially for initial blocking), pattern creation, and any kind of decorative illustration.
- Effectiveness & Evidence: This is a standard and highly valued feature in modern digital art software. Procreate's Drawing Assist, for example, includes robust and easy-to-use symmetry options.6
- Caveats & Common Mistakes: If used without thought, it can make designs look *too* perfect, a bit rigid, or even unnatural. For organic subjects like faces, remember that subtle asymmetries often add realism and character, so 100% perfect symmetry might be undesirable for your final touches. It's also easy to forget the tool is on and accidentally continue drawing non-symmetrical elements symmetrically!
- Verification: This is a standard feature in most leading digital art applications; Procreate's version is particularly well-documented and popular.6
-
AI Pose References (e.g., Magic Poser, DesignDoll, AI Image Generators)
(Example: Search "AI pose reference apps" or "Midjourney for art reference")
- Technique Description: This involves utilizing specialized 3D posing software (like Magic Poser, DesignDoll, or Clip Studio Paint's built-in 3D models) that often incorporate AI-assisted posing or extensive libraries. Alternatively, artists are increasingly employing AI image generation platforms (such as Midjourney, DALL-E, or Stable Diffusion) to create custom visual references for characters, anatomy, scenes, or objects. You can adjust 3D models into almost any desired pose or use text prompts to generate unique reference images tailored to your needs.
- Why It Works: These tools provide incredibly rapid access to a virtually limitless range of poses, anatomical angles, lighting scenarios, and thematic imagery. This means you don't always need live models, physical props, or extensive (and often frustrating) online photo searches. AI can generate novel combinations or very specific scenarios that might be incredibly hard to find otherwise, sparking new ideas.
- Materials & Time Needed: You'll need access to an AI posing app, 3D modeling software with poseable figures, or an AI image generation service (some offer free tiers with limitations, while others are subscription-based). Generating a useful reference can take just minutes.
- Skill Level & Audience: Suitable for all skill levels. It's particularly beneficial for figure drawing, character design, concept art, and illustration where dynamic or unusual poses are needed.
- Effectiveness & Evidence: This is an emerging and rapidly growing trend in the art community. Many apps and tools are becoming available, with numerous online reviews and tutorials demonstrating their use and potential.
-
Caveats & Common Mistakes:
- Anatomical Flaws: Be aware that AI-generated or even some basic 3D model anatomy can occasionally be incorrect, awkward, or physically impossible. Your critical judgment and anatomical knowledge are still required to interpret and refine these references.
- Ethical Concerns: There are ongoing and important discussions about the ethics of using AI-generated images as direct reference for final artwork, especially regarding copyright, artist attribution, and the potential displacement of artists. It's a complex area to navigate thoughtfully.
- Over-Reliance: Depending too heavily on pre-made or AI-generated poses might hinder the development of your skills in constructing figures from imagination or truly understanding underlying anatomy. Use them as a tool, not a crutch.
- "AI Look": Some AI-generated images have a recognizable aesthetic or common artifacts. Be mindful that this might inadvertently carry into your artwork if you're not carefully interpreting and adapting the reference.
- Verification: This is a rapidly evolving field with an increasing number of tools, dedicated user communities, and online tutorials popping up all the time.
-
Custom Shortcut Keyboards/Panels (e.g., Loupedeck, Stream Deck, Tablet ExpressKeys)
(Example: Clip Studio Paint - Keyboard Shortcut Guide -
52
)
- Technique Description: This efficiency hack involves using dedicated hardware devices, like programmable mini-keyboards, keypads such as the Elgato Stream Deck, or specialized art controllers like Loupedeck. Alternatively, software-based on-screen panels can be used.52 The idea is to assign frequently used commands, tools, or even complex macros in your digital art software to single, easily accessible buttons. Many graphics tablets (e.g., from Wacom) also have built-in customizable ExpressKeys and touch rings designed for this very purpose.
- Why It Works: This can significantly speed up your digital art workflow by drastically reducing the need for mouse clicks through multiple menus or remembering and executing complex multi-key keyboard shortcuts. It makes actions like tool switching, layer operations, undo/redo, and other common tasks more ergonomic, intuitive, and incredibly efficient.52 This allows you, the artist, to stay focused on the creative process rather than fumbling with controls.
- Materials & Time Needed: A programmable keypad/controller (this is a hardware purchase), or software for on-screen panels. If you have a graphics tablet with ExpressKeys, you're already set! Setup time for customization can vary from a few minutes for basic assignments to a couple of hours for a highly personalized and complex layout.
- Skill Level & Audience: Best suited for serious amateur to professional digital artists who spend significant time in art software and are keen to optimize their workflow for maximum productivity.
- Effectiveness & Evidence: These are popular tools among professional digital illustrators, painters, graphic designers, and video editors. Many reviews and tutorials demonstrate their substantial benefits for productivity. Even without extra hardware, mastering standard keyboard shortcuts is vital for speed.52
- Caveats & Common Mistakes: There's the cost of additional hardware if you go that route. There's also a time investment required to set up your custom layouts and then develop the muscle memory for your new shortcuts – it might feel slower at first! Different software programs may also require different profiles or setups.
- Verification: These are common tools for professional digital creatives;52 the linked guide, for example, provides a basis for standard software shortcuts, which these dedicated devices expand upon and make more accessible.
3.6.3. Green & Clever: Eco-Friendly & DIY Material Hacks
These hacks are all about sustainability, resourcefulness, and often saving a bit of cash! They focus on using recycled, natural, or homemade materials and tools, proving that great art doesn't have to cost the Earth (or your wallet).
-
Homemade Sketchbook Binding
(Example: Search "DIY sketchbook binding tutorial" on YouTube)
- Technique Description: This involves creating your very own sketchbooks by hand! You can use your preferred types of paper (including recycled or reclaimed paper, which is fantastic) and various simple binding techniques. Common methods include the pamphlet stitch (great for thin books), the Coptic stitch (which allows the book to lay completely flat – super useful!), or Japanese stab binding (which looks beautiful). Covers can be made from sturdy cardboard, fabric-covered board, or other recycled materials you might have around.
- Why It Works: This allows for complete customization of your sketchbook's size, the type of paper inside (e.g., watercolor paper, drawing paper, toned paper – whatever you love!), and the cover design. It can be a much more economical option than buying pre-made sketchbooks, especially if you like using specialized papers. Plus, it promotes the reuse and upcycling of materials, which is great for the planet!
- Materials & Time Needed: Paper for the pages, material for the cover (like heavy cardstock, bookboard, or decorated paper), strong thread (waxed linen thread is excellent), a sturdy needle, an awl (for punching holes), a ruler, and a cutting tool. Creating a simple sketchbook can take about 1-3 hours, and it's a very rewarding process.
- Skill Level & Audience: Perfect for artists with an interest in crafts and DIY projects, those seeking truly custom sketchbooks, or anyone who is environmentally conscious and loves a hands-on activity.
- Effectiveness & Evidence: This is a popular craft activity, and you'll find many detailed and inspiring tutorials available online (on blogs, YouTube, Pinterest, and more).
- Caveats & Common Mistakes: It does require some basic craft skills, a bit of patience, and the right tools for a durable and neat result. The quality of the binding will depend on the technique you choose and the care you take. Also, ensure you consider the grain direction of your paper for better folding and page turning – it makes a difference!
- Verification: This is a well-documented DIY craft within the art and bookbinding communities.
-
Sustainable Supply Alternatives
(Example: JerryPoon.com - Eco-Friendly Art Practices -
53
)
-
Technique Description: This hack is all about consciously choosing art supplies that are made from renewable resources, contain recycled content, or generally have a lower overall environmental impact. Some examples include:53
- Paper/Canvas: Using paper made from bamboo, hemp, or post-consumer recycled waste. Choosing canvases made from recycled materials (like those made from recycled plastic bottles) or organic cotton.
- Paints: Opting for water-based paints (like acrylics, gouache, watercolor) which are generally lower in toxins and much easier to clean up than oil-based paints that require harsh solvents. Water-mixable oil paints are also a good alternative for those who love the feel of oils but want easier cleanup.
- Brushes/Tools: Selecting brushes with handles made from sustainable wood or bamboo, and bristles made from high-quality synthetic materials rather than animal hair.53 Also, get creative by reusing household items as tools, such as old bedsheets for drop cloths, or produce trays and old toddler plates for paint palettes!38
- Why It Works: Making these choices helps reduce the environmental footprint associated with art-making by conserving resources, minimizing pollution, and supporting more sustainable manufacturing practices.53 Reusing items also cleverly diverts waste from landfills, giving them a second life in your studio.38
- Materials & Time Needed: This involves a bit of research and sourcing to find these alternative supplies. The usage time for the supplies themselves is standard.
- Skill Level & Audience: Relevant for all artists, particularly those who are environmentally conscious and want their creative practice to align with their values.
- Effectiveness & Evidence: There is a growing availability and promotion of eco-friendly art supplies from various manufacturers, which is fantastic news!53 Many artists and organizations are actively advocating for more sustainable art practices.
- Caveats & Common Mistakes: Some eco-friendly alternatives may occasionally be more expensive or perform slightly differently than their traditional counterparts, so a little experimentation might be needed. Availability might also be limited in some regions, though it's improving. Be wary of "greenwashing" (false environmental claims) – researching brands is always a good idea.
- Verification: Information is available from environmental art organizations, eco-conscious art suppliers, and articles promoting sustainable practices.38
-
Technique Description: This hack is all about consciously choosing art supplies that are made from renewable resources, contain recycled content, or generally have a lower overall environmental impact. Some examples include:53
-
DIY Textured Paint and Mediums
(Example: Claire Douglas Styling - How to Make Textured Paint -
54
)
-
Technique Description: This is where you get to play kitchen scientist! Create wonderfully textured surfaces or paints by mixing common, inexpensive household materials into your standard art paints (like acrylics or gesso). You can also use unconventional materials as texture agents.54 Some ideas include:
- Adding sand, coffee grounds (used and dried thoroughly!), salt, or even fine sawdust to paint for a gritty, earthy texture.
- Mixing baking soda into paint for a chalky, matte, or slightly fluffy, almost cloud-like texture.
- Using joint compound (also known as drywall mud) or plaster of Paris. You can either apply these directly to a canvas and then paint over them, or mix them into your paint to create thick impasto effects or interesting dimensional textures.54
- Sprinkling baking soda onto wet paint for localized, bubbly texture as it reacts.
- Why It Works: This approach provides inexpensive, readily available, and often more eco-friendly ways to add tactile and visual texture to your artworks. It allows for fantastic experimentation beyond traditional (and sometimes pricey) art mediums, letting you discover unique effects.
- Materials & Time Needed: Standard paints (acrylics work well for this), various household additives (sand, coffee grounds, baking soda, salt, joint compound, plaster), mixing tools, and a canvas or other support. Mixing takes just a few minutes, but drying time can vary greatly depending on the additive and how thickly you apply it.
- Skill Level & Audience: Perfect for mixed-media artists, abstract artists, hobbyists, and anyone looking to experiment with texture on a budget or with a sustainable mindset.
- Effectiveness & Evidence: Many DIY art blogs and channels demonstrate these fun and effective techniques.54 Joint compound and plaster, for instance, are commonly used for creating those popular textured canvas art pieces you see.55
-
Caveats & Common Mistakes:
- Archival Quality: The long-term stability and archival properties of some household additives when mixed with art paints can be questionable. If longevity is a major concern for a particular piece, it's best to test thoroughly or opt for archival-quality texture gels and mediums from art supply stores.
- Compatibility: Some additives might not mix well with certain paints or could affect their adhesion or flexibility over time (e.g., causing cracking if the layer is too thick or inflexible). Always do a small test!
- Weight: Thick applications of materials like plaster or joint compound can add significant weight to a canvas, so ensure your support is sturdy enough.
- Safety: When using powdered materials like plaster or joint compound, always wear a dust mask to avoid inhalation. Good ventilation is also key.
- Verification: These techniques are well-documented in DIY art resources and craft tutorials.54
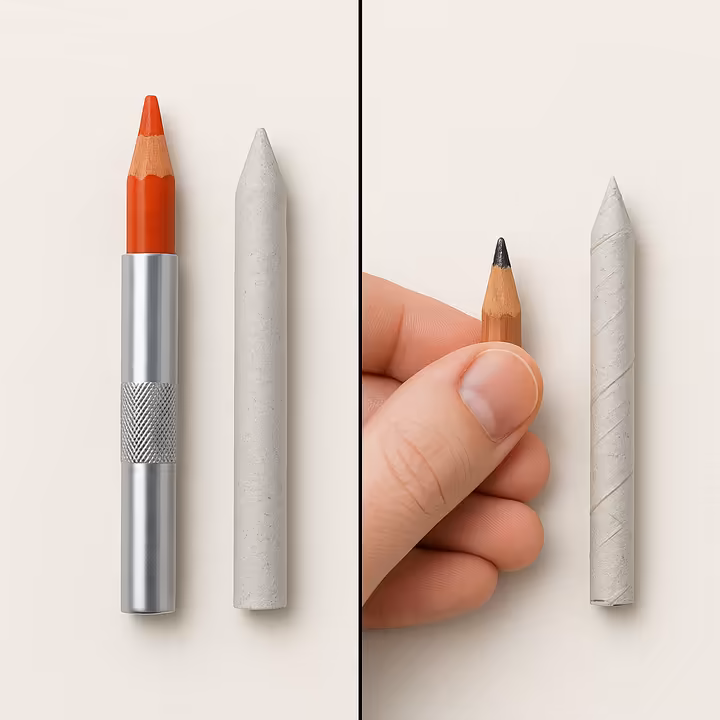
-
Technique Description: This is where you get to play kitchen scientist! Create wonderfully textured surfaces or paints by mixing common, inexpensive household materials into your standard art paints (like acrylics or gesso). You can also use unconventional materials as texture agents.54 Some ideas include:
3.7. Train Your Brain: Habit & Mindset Hacks
These hacks aren't so much about specific drawing techniques, but more about tweaking the *way* you learn and practice. They tap into principles from neuroscience and learning psychology to make your practice sessions more effective, sustainable, and aligned with how your brain actually learns best. Think of them as optimizing the conditions for artistic growth!
-
Pomodoro Sketching (Timed Focus Intervals)
(Example: Berklee Online - Pomodoro Technique for Music Practice -
56
)
- Technique Description: This involves applying the well-known Pomodoro Technique to your drawing practice. You break down your sketching session into focused intervals, traditionally 25 minutes long (each called a "pomodoro"). These are separated by short breaks, usually around 5 minutes.56 After about four pomodoros, you take a longer, more refreshing break of 15-30 minutes.
- Why It Works: This method helps combat mental fatigue and maintain high levels of concentration by working *with* your brain's natural rhythms of focus and attention, which tend to occur in shorter bursts rather than long, drawn-out slogs.12 The regular, short breaks prevent burnout, refresh your mental energy, and can make daunting tasks feel much more manageable. This, in turn, improves overall productivity and consistency in your practice.56
- Materials & Time Needed: A timer (a simple kitchen timer, a phone app, or a web app will do), plus your usual sketching tools and paper. Each full pomodoro cycle (work + short break) is typically 30 minutes.
- Skill Level & Audience: Beneficial for all skill levels. It's especially helpful for individuals who struggle with procrastination, find it hard to maintain focus during long study periods, or often feel overwhelmed by large drawing projects.
- Effectiveness & Evidence: The Pomodoro Technique is a widely used and well-regarded time management method developed by Francesco Cirillo. Its principles are applicable to any task requiring sustained mental effort, including creative work like drawing or music practice.56
- Caveats & Common Mistakes: For some artists, the rigid 25-minute interval might occasionally interrupt a state of "flow" if you're really in the zone. The good news is the technique is adaptable; feel free to experiment with different work/break durations (e.g., 45 minutes of work followed by a 15-minute break) to find what suits your personal rhythm best. The key principle is focused work followed by deliberate rest.
- Verification: Supported by a wealth of productivity literature and successfully adapted for various learning contexts.56
-
Non-Dominant Hand Warm-ups
(Example: General creativity workshop exercises)
- Technique Description: This involves performing simple drawing exercises, such as drawing basic shapes (circles, squares), continuous flowing lines, or even blind contour drawings of objects, but using your *non-dominant* hand. Yes, the one you don't usually write or draw with!
-
Why It Works: Drawing with your non-dominant hand can be surprisingly beneficial! It can help to:
- Activate Different Neural Pathways: It challenges your brain in a novel way, potentially fostering new neural connections and ways of thinking.
- Bypass Ingrained Habits: The lack of fine motor control with your non-dominant hand forces a more intuitive, less controlled, and often more observational approach. This can disrupt habitual, overly analytical drawing patterns developed by your dominant hand.
- Enhance Creativity: By breaking your usual routine and encouraging a more playful, less critical mindset (as expectations for perfection are naturally lower), it can sometimes unlock fresh creative perspectives and ideas.
- Improve Bilateral Coordination Awareness: It can increase your awareness of how both sides of your body (and brain) contribute to motor tasks, which can be surprisingly insightful.
- Materials & Time Needed: A pencil or any simple drawing tool, and some paper. This is typically used as a short warm-up exercise for about 5-10 minutes before you get into your main drawing session.
- Skill Level & Audience: Great for all skill levels, particularly if you're feeling creatively "stuck," want to loosen up your style, or just try something different and fun.
- Effectiveness & Evidence: This exercise is often suggested in art therapy, creativity workshops, and some drawing classes as a way to stimulate right-brain activity and break out of rigid thinking patterns.
- Caveats & Common Mistakes: The resulting drawings will inevitably be clumsy and awkward – and that's perfectly okay! The focus must be on the process and the sensory/cognitive experience, not on the aesthetic quality of the output. Think of it as a warm-up or an exploratory exercise, not a technique for finished pieces.
- Verification: A commonly cited exercise in resources focused on creativity, brain lateralization in art, and "drawing on the right side of the brain" concepts.
-
Deliberate Practice Drills (Focused on Specific Weaknesses)
(Example: ArtistStrong.com - How to Get Better at Drawing -
32
)
- Technique Description: This powerful approach, based on Anders Ericsson's research on expert performance, involves first identifying a specific, narrowly defined weakness in your drawing skills. This could be anything from drawing ellipses accurately in perspective, to rendering smooth value transitions, capturing dynamic gestures, or improving line confidence.32 Then, you engage in highly focused, repetitive exercises designed *specifically* to improve that single skill. Key components include setting clear goals for each session, pushing yourself just beyond your current comfort zone (that "sweet spot" of productive discomfort), receiving immediate and constructive feedback (from self-critique, a mentor, or peers), and refining your technique through repetition.
- Why It Works: Targeted, focused practice is significantly more effective for skill acquisition than diffuse, unfocused effort or simply "putting in hours" without a clear goal.32 By concentrating on specific weaknesses and systematically working to overcome them, artists can make much more rapid and tangible improvements. Your brain forms stronger neural pathways related to the practiced skill through this intense, focused repetition with constant refinement.
- Materials & Time Needed: This varies greatly depending on the specific drill you're doing. Sessions are often best kept short but intense (e.g., 20-30 minutes of highly focused training) to avoid mental exhaustion and maintain quality of practice.32 Examples of drills could include blind contour drawing for hand-eye coordination, value studies with limited palettes, gesture drawing for movement, negative space drawing for composition,32 or specific line and hatching exercises to improve control and texture.58
- Skill Level & Audience: Suitable for artists of all levels who are serious about systematic improvement and willing to engage in challenging, focused practice.
- Effectiveness & Evidence: This approach is strongly supported by decades of research in cognitive psychology and the science of expertise.32 It's how experts get so good!
- Caveats & Common Mistakes: Deliberate practice can be mentally taxing and may not always feel "fun" in the moment, but the rewards are significant. It requires honest self-assessment to identify your true weaknesses and then design appropriate, challenging drills. Without some form of feedback, it's possible to practice errors, so having a mechanism for critique (even if it's just comparing your work to a reference and analyzing differences) is important.
- Verification: This is grounded in established learning science and principles of expert performance.32
-
Visual Chunking (Breaking Complex Scenes into Manageable Parts)
(Related to Grid Method principles -
9
)
- Technique Description: When you're faced with a really complex subject or scene, this technique involves mentally (or by lightly sketching some divisions) breaking it down into smaller, more manageable "chunks" or sections. You then focus on drawing one chunk at a time, getting it right before moving to the next. Eventually, you integrate all the chunks into a cohesive and accurate whole.
- Why It Works: This strategy cleverly reduces cognitive overload by simplifying the amount of visual information your brain needs to process at any single moment. By focusing your attention on a smaller, defined area, you can observe and render details and relationships much more accurately within that specific chunk. It's a systematic way of tackling complexity, much like eating an elephant one bite at a time! The grid method, in fact, is a formal, structured application of this very principle of visual chunking.9
- Materials & Time Needed: Your standard drawing tools are all you need. This is primarily a mental approach, though light construction lines can certainly be used to mark out your chunks. The time it takes will vary with the complexity of the subject.
- Skill Level & Audience: Useful for all skill levels. It's particularly helpful when you're drawing complex still lifes, intricate landscapes, detailed interiors, or patterns with many repeating elements.
- Effectiveness & Evidence: This is related to cognitive load theory in psychology, which suggests that learning and performance are optimized when the amount of information being processed aligns with our working memory capacity. The proven success of the grid method9 provides strong indirect evidence for the effectiveness of visual chunking.
- Caveats & Common Mistakes: It's important to ensure that the chunks are eventually integrated smoothly and proportionally into the overall composition. There can be a slight risk of the drawing looking disjointed or "patchwork" if the relationships *between* the chunks are not carefully managed as you bring them together.
- Verification: Supported by analogy with the highly effective grid method9 and general principles of cognitive load management in learning.
-
The "5-Minute Rule" for Overcoming Procrastination and Building Habits
(Example: Ahead App Blog - 5-Minute Rule -
12
)
- Technique Description: When you're feeling unmotivated, overwhelmed by a large drawing task, or just struggling to start a practice session, make a deal with yourself: commit to working on it for just 5 minutes. The crucial part of the agreement is that after those 5 minutes are up, you have full permission to stop if you still don't feel like continuing. No guilt, no pressure.
- Why It Works: This simple hack significantly lowers the "activation energy" or initial resistance we often feel when starting a task.12 A 5-minute commitment feels incredibly small and easily achievable, bypassing that mental block of facing a longer, more demanding session. Often, the act of simply starting is the hardest part; once you're engaged, momentum can build, and you might find yourself surprisingly willing to continue for much longer! Each small completion, even just 5 minutes of focused effort, can trigger a little dopamine release, creating a positive feedback loop that reinforces the habit and makes it easier to start next time.12
- Materials & Time Needed: Your sketching tools and paper. The minimum commitment is just 5 minutes of your time.
- Skill Level & Audience: Applicable to all skill levels. It's especially beneficial for those who struggle with procrastination, want to build a consistent drawing habit, or often feel overwhelmed by large projects or the blank page.
- Effectiveness & Evidence: This is supported by cognitive science and habit formation research, which consistently emphasize breaking down tasks into small, manageable steps to reduce overwhelm and leverage the brain's reward system.12 Plus, the act of making art itself, even briefly, activates multiple brain areas, enhances neuroplasticity, and can be wonderfully meditative, reducing stress and improving mood!59
- Caveats & Common Mistakes: The primary goal here is simply to *start*. There should be absolutely no pressure to create a masterpiece or achieve significant progress within that initial 5 minutes. The permission to stop after 5 minutes must be genuine and honored – that's what makes the psychological trick work so effectively.
- Verification: Based on well-established principles of behavioral psychology and proven productivity strategies.12
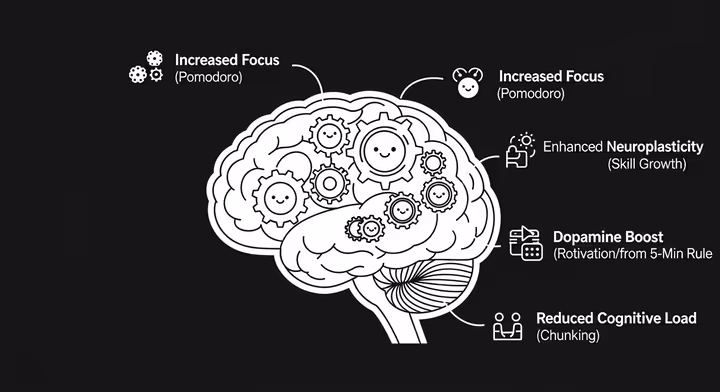
4. Thinking Deeper: Beyond the Shortcut
While drawing hacks offer a ton of benefits, especially when you're starting out or looking for ways to be more efficient, it's really important to approach them with a balanced view. Leaning too heavily on shortcuts without also building up your fundamental skills can eventually limit you and slow down your long-term artistic growth. This section takes a critical look at the role of hacks, exploring their potential downsides and how you can smartly bridge them to stronger, more foundational art knowledge.
4.1. Know Your Limits: When Hacks Aren't Enough
Drawing hacks, by their very design, often simplify or bypass certain parts of the traditional learning process. While this can feel incredibly empowering at first, relying too much or only on them can lead to a few potential downsides that are good to be aware of.
- Creation of Bad Habits or a Superficial "Bag of Tricks": If you adopt hacks without really understanding the artistic principles they touch upon, you might end up with a collection of isolated tricks rather than a solid, cohesive understanding of drawing. For example, consistently using a specific shading hack without learning about light, form, and value theory can lead to formulaic shading that doesn't adapt well to different lighting conditions or subjects. This can create habits that are surprisingly hard to unlearn later. Chasing "cheat codes" without putting in the "pencil mileage" (that sheer volume of practice) can lead to a skill set that's only skin deep.21
- Prevention of Fundamental Skill Development: Core drawing skills are things like keen observation, constructive drawing (understanding how to build form), anatomical knowledge, perspective theory, and critical visual thinking. Some hacks, particularly those that offer quick, impressive results with minimal effort, might inadvertently discourage the sustained, focused practice needed to develop these deeper competencies.61 For instance, if an artist *always* relies on a grid for proportions, their ability to judge spatial relationships freehand might not develop as strongly as it could.23 Similarly, overusing digital tools like "undo," "liquify," or "transform" can sometimes make artists a bit "lazy" with their raw drawing skills, hindering the development of line confidence and the precision that comes from making (and learning from) indelible marks on paper.62
- Skill Stagnation and Inability to Innovate: Artists who depend too heavily on a fixed set of hacks might find their growth starts to plateau. They might be able to perfectly execute the specific effects their known hacks produce, but then struggle when faced with new artistic problems, different subject matter, or the desire for more personal, creative expression that goes beyond the scope of their familiar shortcuts. True artistic versatility and innovation often spring from a deep understanding of fundamentals, which allows for flexible application and creative problem-solving. The whole point of deliberate practice is to push beyond your comfort zones;32 hacks, if misused, can accidentally keep an artist comfortably within the limits of what they already know how to "trick."
- Lack of Understanding "Why": Many hacks effectively show you *how* to achieve a certain look, but they may not inherently teach you *why* that look is effective or how it relates to visual reality or core artistic principles. For example, a hack for drawing an anime eye might give you a step-by-step method,30 but offer no real insight into the actual anatomy of an eye or the principles of conveying expression through subtle changes in form. This lack of "why" limits an artist's ability to adapt the hack, troubleshoot when it doesn't quite work, or apply the underlying principle in new and different contexts.61
- The "Training Wheels" Dilemma: As some educators wisely point out, tools like the grid method can be like training wheels on a bicycle: incredibly helpful for initial balance and confidence, but they must eventually come off if you want to learn how to ride independently.27 If an artist never moves beyond the "training wheels" provided by certain hacks, their fundamental drawing abilities may remain underdeveloped, limiting their freedom and versatility.
Professional artists and educators often share nuanced views on this. Jim Leggitt, an advocate for "drawing shortcuts," emphasizes combining them intelligently with traditional hand-drawing fundamentals and leveraging technology wisely – not as a replacement for skill, but as an enhancement.63 Discussions within artist communities often reveal concerns that a constant quest for instant gratification through hacks can overshadow the appreciation for the journey of learning and the deep satisfaction of hard-won skill.21
Some educators might view hacks as potentially harmful if they are presented as a complete substitute for rigorous study and practice, especially if they lead to a misunderstanding of core artistic concepts.65 The general consensus, however, leans towards hacks being beneficial when they are integrated thoughtfully into a broader learning strategy that also prioritizes and builds upon those crucial fundamentals.
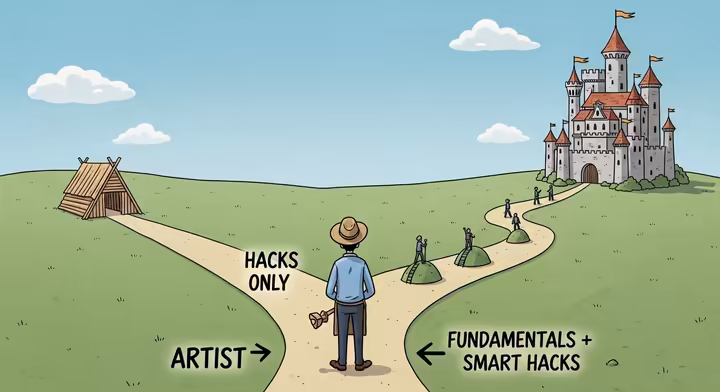
4.2. From Hacks to Habits: Building Real Skills
The most effective way to use drawing hacks isn't as an end in themselves, but as clever stepping stones or "scaffolding" that helps you reach a deeper understanding and mastery of fundamental drawing skills. When hacks are used to build that initial spark of confidence and provide a tangible grasp of a concept, they can make learning more complex principles feel less intimidating and much more accessible. The key is a conscious and guided transition from simply relying on the shortcut to truly internalizing the underlying skill.
-
From Grid to Construction (e.g., Portraits):
A beginner might start drawing portraits using the grid method23 to achieve accurate proportions and feature placement. This hack provides immediate positive reinforcement by often yielding a recognizable likeness, which is super encouraging! To "graduate," the learner can then be introduced to structural methods like the Loomis head.47 The Loomis method also uses a form of geometric construction (a sphere and cross-contour lines) but focuses more on understanding the 3D form of the head and how features wrap around it. The prior success with the grid method can make the more abstract construction of the Loomis head feel less daunting. The artist can then practice drawing the Loomis head from various angles, eventually progressing to freehand portraiture with a solid understanding of head anatomy and perspective, using the foundational knowledge they've built. -
From Tracing/AI Reference to Gesture and Anatomy:
An artist might initially use tracing for complex outlines or AI pose references to quickly visualize figures.66 While these provide an immediate image, the bridge to fundamental skill involves deconstructing these references. The next logical step is to practice gesture drawing8 from these same poses (or similar ones from life or photos), focusing on capturing movement and form quickly, rather than just the outline. This builds crucial observational skill and an understanding of dynamism. Further progression involves studying basic anatomy – understanding the skeletal structure and major muscle groups – which explains *why* the traced or referenced pose looks the way it does. This deeper knowledge allows the artist to eventually construct figures from imagination or adapt references much more convincingly. Even refining a traced sketch with freehand details, shading, and textural work is an intermediate step that already begins this important transition.66 -
From Basic Shapes to Form Analysis:
Starting drawings by breaking down subjects into basic geometric shapes (circles, squares, cylinders) is a common and very helpful beginner hack.29 To move beyond this, the artist needs to learn how these simple shapes combine to create complex 3D forms. This involves studying how light interacts with these forms to create highlights and shadows, which means understanding value and form principles. Exercises like shading basic geometric objects (spheres, cubes, cones) and then applying that understanding to the more complex forms built from the initial shape breakdown are absolutely crucial. This transitions the artist from simply identifying shapes to truly analyzing and rendering three-dimensional volume. -
From Smudging to Controlled Blending:
A beginner might use smudging with a finger or cloth for quick, soft shading.28 To develop this into a more robust and versatile skill, they should first analyze *why* smudging works (it physically moves and smooths the pigment particles). Then, they can experiment with more controlled blending tools like tortillons or blending stumps, practicing varying pressure and stroke direction to achieve specific, intentional effects. Learning about different pencil grades and how they layer and blend, and practicing techniques like hatching and cross-hatching to create value *before* blending, adds further sophistication and control. This moves from an intuitive hack to a deliberate and controlled application of various blending techniques.
The process of bridging these hacks to deeper skills involves deconstructing the hack: figuring out the core art principle it simplifies or exploits. For example, if a quick "drop shadow" hack makes an object appear 3D, the learner should then be guided to explore the broader principles of light direction, cast shadows, and form shadows.
This analytical step transforms the hack from just a mere trick into a gateway for more profound learning. As one Reddit user insightfully implied, even if you're using a "collage of source materials" (which can be a compositional hack), you still need to learn the basics or "retune the ingrained muscle memory" to make it truly your own.61 Hacks can serve as that initial, confidence-boosting "activation energy," making the more rigorous, yet ultimately more rewarding, journey into fundamentals more palatable and successful.
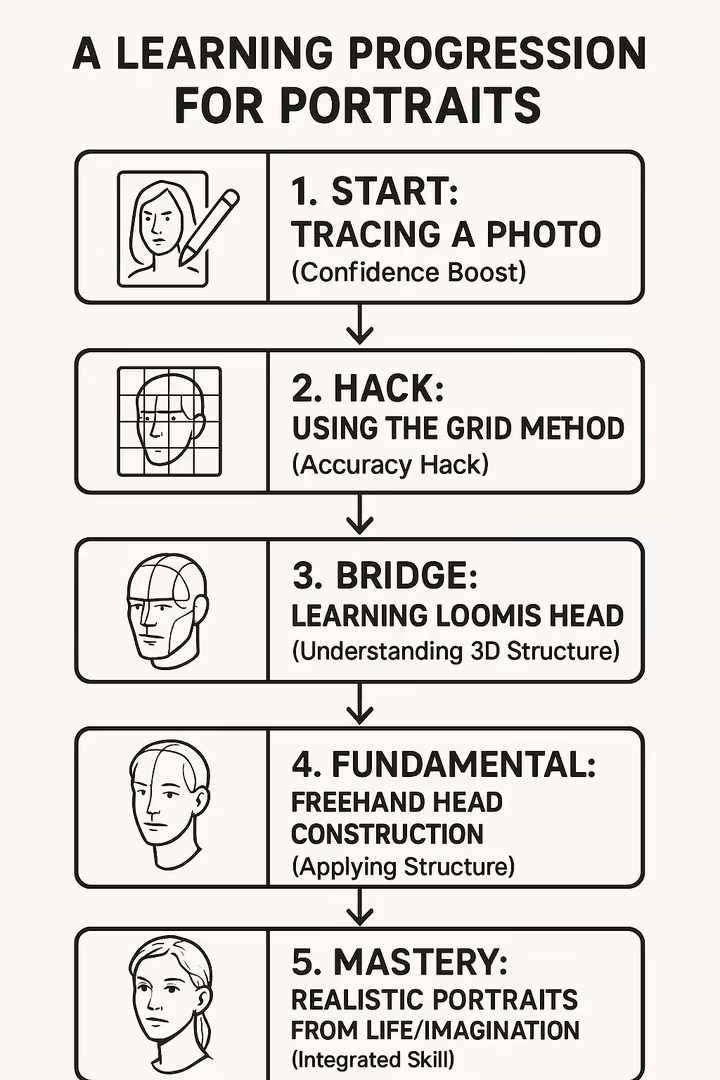
5. Pro Tips & Insights: Wisdom from Experienced Artists
Insights from professional artists, seasoned educators, and influential creators reveal something interesting: "hacks," or smart, efficient methods, aren't just for beginners. Professionals often develop or adopt sophisticated shortcuts and highly optimized workflows to enhance their creativity, meet demanding deadlines, and achieve their specific artistic goals. Their perspectives underscore the immense value of intelligent problem-solving in the art-making process.
Jim Leggitt, FAIA, Architect, Urban Planner, and Illustrator:
Author of the insightful book *Drawing Shortcuts: Developing Quick Drawing Skills Using Today's Technology*, Leggitt champions an approach that beautifully merges traditional hand-drawing techniques with modern digital tools.63 His philosophy often boils down to "Let Technology Do Your Dirty Work," suggesting that digital aids can expertly handle the laborious aspects of drawing. This, in turn, frees up the artist to focus more on creativity and effective communication.
He emphasizes that while technology offers incredible speed and precision, the expressive power of hand drawing remains irreplaceable for conveying emotion and character.63 His work suggests that effective "shortcuts" for professionals involve a synergistic use of both analog and digital realms, rather than a wholesale abandonment of traditional skills. Students in his workshops have shown remarkable improvements in their rendering skills and confidence by adopting these hybrid methods. This approach helps wean them from a sole dependence on computer-generated images and actually enhances their freehand abilities.64
Angela Quezada Padron, Author-Illustrator:
Padron highlights the incredible efficiency that digital tools bring to her illustration process. While she has a deep love for traditional mediums, she now colors "mostly everything in with a mix of Photoshop and Procreate to save time." She even incorporates scanned textures to "still maintain a hand-illustrated look."68 This is a clear and effective "hack" for achieving a traditional aesthetic with the speed and flexibility that digital tools offer.
She notes, "The digital tools available to artists today definitely are helpful to save time, to keep colors and characters consistent, and to provide a wide range of brushes and textures to incorporate."68 This perspective beautifully shows how professionals leverage technology for consistency and efficiency, which are absolutely crucial in fields like publishing.
Anne Appert, Author-Illustrator:
Appert's artistic journey includes teaching herself "how to create watercolor paintings in Procreate in order to give myself more flexibility."68 This clever adaptation of a traditional medium to a digital format, aimed at increasing versatility and potentially speeding up her workflow, is a sophisticated hack in itself.
She also shares a more unconventional "hack" for motivation: her first book, Blob, "started out of spite," demonstrating how even strong emotions can be powerfully channeled into creative productivity!68 Her process also includes rapid idea generation followed by a "simmering" period, a kind of mental shortcut to let concepts develop and mature.68
Tadgh Bentley, Author-Illustrator:
Bentley, who is largely self-taught via the internet, offers a fantastic piece of advice for digital artists: "If you’re a digital artist, I highly recommend experimenting with a simple palette of physical paints to better understand color mixing. It will make your digital art SO much better."68 This is an invaluable "hack" for digital artists to quickly grasp fundamental color principles that directly translate to improved digital work, often more efficiently than through digital experimentation alone.
He also emphasizes focusing on "the process rather than the end product," a wonderful mindset hack that can reduce pressure and foster greater experimentation and enjoyment in art-making.68
Mark C. Collins, Children's Illustrator:
Collins has impressively used Adobe Illustrator with a click-and-drag mouse technique since the early 90s, demonstrating a long-term adherence to a specific digital workflow that is highly efficient for his style.69 His statement that he has "never had creative block... my head is constantly full of ideas"69 might not be a "hack" in the traditional sense, but it points to a mindset of continuous ideation that effectively prevents common artistic hurdles like creative slumps.
These expert perspectives reveal that professionals actively seek out and implement methods to work smarter, not just harder. Their "hacks" are often highly personalized, evolving with their experience, and deeply integrated into a profound understanding of their craft. They are not about cutting corners on quality, but about optimizing the path to achieving their artistic vision efficiently and effectively. This reinforces the idea that intelligent shortcuts are a valid and valuable part of artistic practice at all levels of skill.
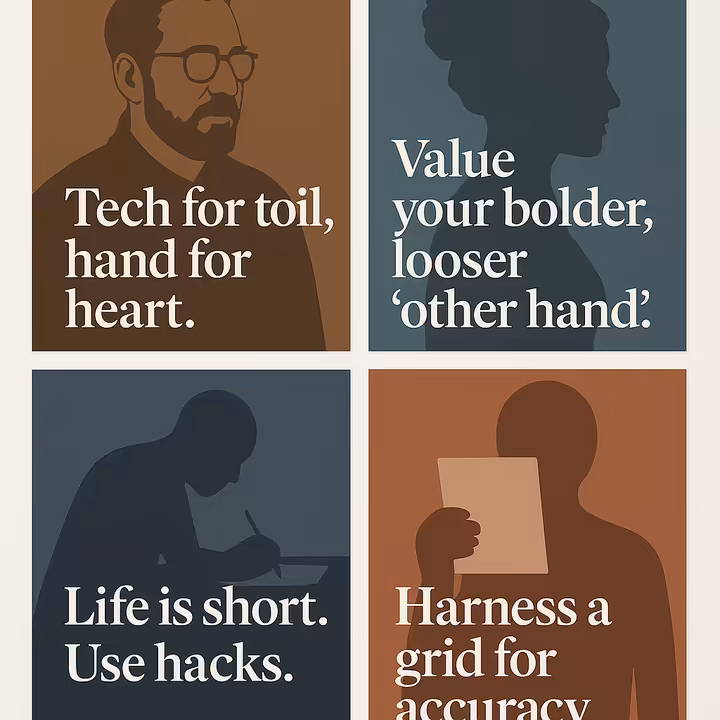
6. Fixing Common Snags: Troubleshooting Drawing Problems
Many aspiring artists, and even some seasoned ones, encounter similar roadblocks on their creative journey. This section identifies some common drawing problems and cleverly links them to specific hacks discussed in this playbook. Our aim is to offer practical solutions to help you overcome these challenges effectively.
Understanding these common pitfalls and knowing how to address them can significantly accelerate your learning and reduce frustration. Many of these issues stem from a misunderstanding of fundamental principles or psychological barriers, which the right hacks can help address either directly or indirectly. Let's get troubleshooting!
| Common Drawing Problem | Description | Relevant Hack(s) from Compendium | Why the Hack Helps |
|---|---|---|---|
| Shaky/Hesitant Lines | Your lines appear wobbly, uncertain, or look overworked. This often comes from a lack of confidence or incorrect arm movement (drawing from the wrist instead of the shoulder/elbow). | Continuous Line Drawing4, Gesture Drawing Timers8, Deliberate Practice Line Drills58, Digital Drawing Assist (e.g., Procreate's line smoothing)6, Rotate Pencil As You Draw.1 | These build hand-eye coordination, encourage smoother, more confident strokes from the shoulder/elbow, force quicker decisions (less time to hesitate!), digital tools can ensure perfect lines when needed, and pencil rotation maintains a consistent point for smoother delivery. |
| Poor Proportions | The subject's parts (like facial features on a portrait, or limbs on a figure) are incorrectly sized or placed in relation to each other, making things look "off." | Grid Method9, Basic Shapes Construction9, Feature Placement Guides (e.g., simplified Loomis head)47, Measuring with Pencil (sighting technique)29, Drawing Upside Down.29 | These methods break complex forms into more manageable parts, provide structural guides for accurate placement, offer ways for comparative measurement against your reference, and can even trick your brain into bypassing symbolic processing to see shapes more accurately. |
| Flat-Looking Drawings (Lack of Depth) | Your artwork appears two-dimensional and lifeless, lacking a convincing sense of volume, form, or spatial depth. Objects don't feel like they have weight or sit in a 3D space. | Shading in Multiple Directions (following form)1, Cross-Hatching/Hatching9, Drop Shadows for instant lift, One/Two-Point Perspective Hacks29, Not Using Rich Darks (Solution: Use full value range from light to dark).70 | These techniques create the illusion of form through careful application of light and shadow, use linear perspective to suggest space and distance, and ensure a full range of values from the lightest lights to the darkest darks, which is crucial for defining dimensionality. |
| Muddy Shading / Uneven Gradients | Shaded areas look dirty, overworked, have distracting visible pencil strokes, or show abrupt, unblended tonal shifts instead of smooth transitions. | Blending with Stump/Cloth/Tissue1, Shading in Multiple Directions (consistent layering)1, Erase Your Highlights (subtractive blending with a kneaded eraser)1, Lightly Sketch with a 2H Pencil First (then build tones).9 | These methods help smooth out pigment application for even tones, lift excess pigment for cleaner lights and smoother transitions, encourage building tones gradually to avoid overworking the paper, and ensure an even coverage of the paper's tooth for consistent shading. |
| Difficulty with Perspective | Objects in your drawing do not appear to recede correctly into space, or entire scenes lack a convincing sense of depth and realism. Things might look tilted or distorted. | One-Point Perspective Shortcuts (for roads, hallways)29, Two-Point Perspective Shortcuts (for angled objects like buildings)29, Method for Division and Duplication in Perspective (for repeating elements).40 | These hacks provide simplified geometric rules and clear, step-by-step procedures for constructing objects and scenes with convincing depth and accurate foreshortening, making perspective much less intimidating. |
| Smudged Artwork / Dirty Paper | Unintentional marks, fingerprints from oily hands, or loose graphite/charcoal dust end up marring the drawing surface, making your hard work look messy. | Place a Sheet of Paper Under Your Hand (a "bridge" for your drawing hand)1, Use a Transparent Sheet (like acetate) Under Your Hand1, Masking Tape for Neat Borders (protects edges)1, Use a Soft Brush for Graphite Dust (don't blow or wipe!).1 | These simple habits protect the drawing paper from skin oils and sweat, prevent your drawing hand from dragging over and smudging finished areas, create clean, professional-looking edges, and allow you to remove loose pigment safely without smearing it. |
| "I Can't Draw X" (Fear of Specific Subjects) | Feeling completely overwhelmed, intimidated, or incapable when attempting to draw particular complex subjects like hands, faces, animals, or intricate objects. | Break Down into Basic Shapes9, Gesture Drawing (focus on flow, not detail)8, Blind Contour Drawing (focus on observation)32, Drawing Upside Down (bypass symbolic brain)29, Using Reference Photos Systematically (with Grid or Tracing as a starting aid to understand form). | These approaches help simplify perceived complexity, shift focus to essential form and movement rather than daunting detail, improve pure observation without judgment of accuracy, and provide a structured, less scary approach to unfamiliar or challenging forms. |
| Creative Block / Lack of Motivation | Feeling uninspired, completely stuck, or finding it incredibly difficult to start or continue a drawing. The blank page feels terrifying! | The 5-Minute Rule (just start for 5 mins!)12, Pomodoro Sketching (structured short bursts)56, Scribble/Loosen Up Exercises (playful warm-ups)28, Try a New Hack or Medium (novelty sparks interest), Non-Dominant Hand Warm-ups (breaks routine). | These hacks lower the psychological barrier to starting, provide structure for short, manageable bursts of activity (making tasks less daunting), free up creative inhibitions through playful exploration, introduce novelty which can spark fresh interest, and help break out of mental ruts. |
| Outlining Everything 70 | You tend to define all forms and edges with hard, uniform lines. This often flattens the image, kills depth, and can make drawings look like coloring book pages. | Focus on "Edges" (Value Differences) instead of Lines70, Drawing Without Lines (Constructing with Shading/Tones)29, Vary Line Weight (for deliberate emphasis where needed, not everywhere). | This teaches you to see and represent forms as they are defined by light and shadow meeting, rather than by artificial outlines. It leads to more realism, softer transitions, and a better sense of three-dimensional form. |
| Pressing Too Hard with Pencil 70 | You apply excessive pressure with your pencil from the get-go. This indents the paper, makes lines very hard (or impossible) to erase, and inhibits smooth blending later on. | Lightly Sketch with a Harder Pencil (e.g., 2H or H) First9, Build Up Value Layers Gradually71, Rotate Your Pencil As You Draw (maintains light touch).1 | Harder lead pencils naturally make lighter marks, making initial sketches easier to adjust. Gradual layering allows for much better control over values and easier correction of mistakes. Rotating the pencil helps maintain a consistent light touch and prevents overly dark, unerasable initial lines. |
| Using Scribbled Lines Instead of Value and Shapes 70 | You resort to vague, uncontrolled scribbling for complex textures (like leaves on a tree, strands of hair, or fur) instead of defining underlying shapes and their values. | Blur Your Vision (squint!) to See Shapes/Values70, Visual Chunking (break it down), Negative Space Drawing (see shapes between elements)29, Stippling/Hatching for Controlled Texture.9 | Squinting helps simplify complex areas into discernible shapes of light and dark. Chunking breaks down overwhelming complexity into manageable parts. Negative space helps define positive shapes. Structured texturing techniques provide control. |
| Using the Wrong Paper 70 | You're using paper that is too thin, too smooth, or otherwise unsuitable for your medium. This can lead to difficulty in layering, blending, or achieving rich darks, and can even cause tearing. | Choose Appropriate Paper (generally 70lb+ for drawing, a medium texture/vellum finish is often recommended for beginners using graphite/charcoal).70 | Proper paper provides sufficient "tooth" (texture) for pigment to adhere well, allows for multiple layers and erasing without damage, and supports the desired blending and textural effects for your chosen medium. Good paper makes a huge difference! |
7. Got Questions? FAQs (Frequently Asked Questions)
This section tackles some of the common questions that learners often have about drawing hacks, their legitimacy, and how they fit into overall artistic development. The answers here are synthesized from the research and principles we've discussed throughout this report. Let's clear up some common queries!
-
Are drawing hacks "cheating?"
This is a very common concern, especially among beginners who want to learn "the right way." The short answer is generally no, drawing hacks are not inherently "cheating." This is true provided they are used as tools for learning, for efficiency, or for achieving a specific artistic effect, rather than as a means to deceive others or claim unearned skill.
Many so-called "hacks," like the grid method or the historical use of optical aids such as the camera obscura, have long precedents and were used by renowned artists to solve complex representational problems.7 The intention behind using a hack really matters. If a hack is used to understand a principle better (like a perspective hack to finally grasp vanishing points) or to work more efficiently (like digital symmetry tools for pattern design), then it's a smart application of available resources.
However, if hacks are *solely* used to bypass the development of fundamental skills or to misrepresent one's abilities, then their use becomes problematic. The goal of art is often communication and expression; tools and techniques that aid this, including well-chosen hacks, are valid parts of the process when applied thoughtfully and honestly.21 -
How can I learn to draw faster without losing quality?
Drawing faster without sacrificing quality is a common and understandable goal, particularly for artists with limited time or those with professional aspirations. Several strategies, many of which can be considered "hacks" in the sense of smart, efficient approaches, can definitely help:
- Efficient Workflow Planning: Techniques like thumbnail sketching for composition *before* starting a detailed drawing (a standard practice in comic art and illustration) can save enormous amounts of time by resolving major issues early on, when changes are easy.43
- Deliberate Practice: Focusing your practice sessions on specific, identified weaknesses (e.g., line confidence, speed of observation, rendering a particular texture) through targeted drills can improve both speed and accuracy much more effectively than unfocused, general practice.32
- Mastering Fundamentals: Ironically, a deep and solid understanding of fundamentals (like anatomy, perspective, and form) ultimately leads to faster drawing. This is because it reduces hesitation, guesswork, and the need for extensive corrections later on.
- Timed Exercises: Regularly using gesture drawing timers or Pomodoro sketching sessions can train you to work more decisively and efficiently within set time limits, building speed and confidence.8
-
Leveraging Technology Wisely:
Digital tools offer numerous speed advantages, from layers for non-destructive editing to customizable shortcuts for repetitive tasks.6 Jim Leggitt's work, for example, specifically focuses on intelligently combining digital technology with hand drawing for enhanced speed and efficiency.63
Ultimately, quality in drawing is often linked to confident execution and a strong foundational understanding. So, "hacks" that help build these core aspects will naturally contribute to both improved speed and better quality in your artwork.
-
What are the easiest drawing hacks for beginners to see quick improvement?
Beginners often benefit most from hacks that provide immediate positive feedback and help build that crucial early confidence. Some of the easiest and most impactful hacks for quick wins include:
- Using Basic Shapes for Construction: Simplifying complex objects (animals, people, cars, etc.) into basic circles, squares, and triangles makes them far less intimidating and really helps with getting initial proportions down.9 This offers a quick way to get a recognizable structure on paper almost immediately.
- Simple Smudging/Blending for Shading: Using a finger (with caution for oils from skin), a tissue, or a DIY paper stump to quickly blend pencil or charcoal can instantly create smoother gradients and a sense of form. This makes drawings look more "finished" and three-dimensional with relatively little effort.9
- The Grid Method (Simplified Version): For copying an image accurately, even a very simple grid (e.g., just dividing your reference image and your drawing paper into four equal quadrants) can dramatically improve proportion and the placement of key features. This often leads to a surprisingly quick boost in achieving a good likeness.9
-
Drop Shadows: Adding a simple shadow beneath an object is a very fast and effective way to make it look like it has volume and is sitting on a surface. This instantly adds a 3D effect with minimal work.
These types of hacks offer those valuable "quick wins" that can be incredibly motivating and keep you excited about learning.12
-
Can you really learn to draw from TikTok/YouTube hacks?
Yes, you can certainly learn specific techniques, discover new tools, gain a lot of inspiration, and pick up genuinely useful tips from drawing hacks presented on platforms like TikTok and YouTube! These platforms are brimming with diverse content, often showcasing innovative and efficient methods that artists are using right now. However, it's really important to approach them with a degree of critical evaluation:
- Supplement, Don't Replace: Hacks you find on social media are best used to *supplement* more structured learning of fundamental drawing principles (like perspective, anatomy, value theory, color theory, etc.). Relying solely on isolated hacks without understanding the "why" behind them can lead to a fragmented skillset and gaps in your knowledge.
- Source Credibility: The quality and accuracy of advice can vary wildly from one creator to another. Look for creators who not only show the hack but also explain the principles behind it, not just the trick itself. Those who can articulate the 'why' are often more valuable.
- Context is Key: A hack that works brilliantly for one particular style (like cartooning) or medium (like digital painting) might not be applicable or effective for another (like realistic oil painting). Always consider the context.
-
Active Learning is Crucial: Passive watching is not enough to truly learn. You need to actively practice the hacks you see. More importantly, try to understand how they work and how you might be able to adapt them or combine them with other techniques.
Online hacks can be a fantastic and accessible resource for quick tips, motivation, and discovering new approaches. They are most valuable when integrated into a broader and more foundational approach to learning art.
-
Do I need expensive tools to use drawing hacks?
Absolutely not! This is a common misconception. While some hacks certainly leverage features of specific digital software (which can be an investment) or specialized traditional tools, a vast number of drawing hacks are all about technique, ingenuity, or the clever use of everyday, readily available materials.
Many of the most effective and popular hacks are, in fact, designed to be economical or utilize DIY solutions:
- Technique-Based Hacks: Methods like drawing upside down to improve observation, using basic shapes for construction, gesture drawing for capturing movement, or negative space drawing for better compositions require only basic pencil and paper.8 These are about *how* you see and draw, not what you draw *with*.
- DIY Tool Hacks: Creating your own blending stumps from rolled paper,1 using a simple cloth for shading effects,1 or even the (though disputed for archival quality) hairspray-as-fixative hack are all about resourcefulness and using what you have.
-
Material Hacks:
Eco-friendly hacks often involve reusing household items (like old credit cards for paint spreaders or textured materials for printing) or choosing sustainable, sometimes less expensive, alternatives for art supplies.38 Adding simple things like baking soda or sand to paint for texture uses cheap, common household materials.54
The very essence of a "hack" is often about finding a smarter, more accessible, or more efficient way to achieve a desired result. This frequently means bypassing the need for expensive or specialized equipment. Creativity in problem-solving is the real key here, not the price tag of your tools!
8. Keep Learning: More Resources & Further Reading
This report provides a comprehensive overview of the exciting world of drawing hacks, but remember, the journey of artistic development is an ongoing and wonderfully personal one. For those of you eager to delve deeper into specific techniques, build a stronger foundation in essential skills, or join supportive communities of fellow artists, the following curated list of resources is highly recommended.
Think of this as your next set of stepping stones. Happy exploring!
Influential Books:
- Edwards, B. (1979, and subsequent editions). Drawing on the Right Side of the Brain . TarcherPerigee. (A classic for a reason, this book explores how to shift your perception to improve drawing accuracy.)29
- Leggitt, J. (2010, and subsequent editions). Drawing Shortcuts: Developing Quick Drawing Skills Using Today's Technology . John Wiley & Sons.63 (Focuses on smartly combining traditional hand-drawing with digital tools for efficiency, particularly relevant for design and architectural illustration).
- Loomis, A. (Various, e.g., Fun with a Pencil , Figure Drawing for All It's Worth , Drawing the Head and Hands ). Viking Press/Titan Books. (Timeless guides on constructing figures and heads with clarity and structure.)47
- Friend, T. (2002). Drawing Problems & Solutions: A Trouble-Shooting Handbook . David & Charles.72 (Offers incredibly practical advice on identifying and overcoming common drawing mistakes – a great problem-solver!).
Online Courses & Educational Websites:
- Proko.com: (Stan Prokopenko) Offers truly in-depth courses on anatomy, figure drawing, portraiture, and perspective, often breaking down incredibly complex topics into manageable, understandable lessons.39
- TheVirtualInstructor.com: Provides a wide and varied range of drawing lessons, courses, and critiques, covering numerous mediums and subjects, including excellent foundational exercises.4
- OnlineArtLessons.com: (Darlene Nguyen) Features a wealth of tutorials and courses, including many that explicitly cover "drawing hacks" alongside foundational pencil drawing techniques.1
- TheBeginnerDrawingCourse.com: Offers structured courses specifically aimed at beginners, including style-specific guidance such as helpful anime drawing tips.30
- Ctrl+Paint: (Matt Kohr) A fantastic free video library dedicated to teaching digital painting fundamentals, with a strong emphasis on mastering basic skills and consistent practice.
- School of Motion - "Drawing Fundamentals for Motion Designers": While targeted towards motion designers, the core drawing principles taught are broadly applicable and very well explained.
- Skillshare, Domestika, Udemy: These popular platforms host a multitude of drawing courses from various talented instructors, covering a vast spectrum of styles, techniques, and specific "hacks." You can search for topics like "Procreate hacks," "perspective drawing," or "character design" to find exactly what you need.
YouTube Channels:
- Proko: ( https://www.youtube.com/@ProkoTV ) Consistently high-quality anatomy and drawing tutorials, presented with clarity and humor.39
- Circle Line Art School: ( https://www.youtube.com/@CircleLineArtSchool ) Well-known for excellent perspective drawing tutorials and architectural sketching, often employing clear, easy-to-follow, hack-like methods.40
- Su Melville Art: ( https://www.youtube.com/@SuMelvilleArt ) Offers fantastic "2 Minute Art Hacks," engaging sketchbook prompts, and heaps of creative encouragement, focusing on confident drawing and a positive mindset.20
- Brad's Art School (Brad Colbow): Often reviews digital art tools, software, and discusses efficient workflows and practical tips for digital artists.
- Jazza (Draw with Jazza): ( https://www.youtube.com/@Jazza ) Covers a wide and entertaining range of art challenges, tutorials, and reviews, often incorporating fun and accessible techniques that feel like hacks.
- Art for Kids Hub: ( https://www.youtube.com/@ArtforKidsHub ) An excellent resource for simple, engaging, step-by-step drawing tutorials for children, often using shape-based hacks to make drawing easy and enjoyable.34
- Alphonso Dunn: Focuses on beautiful pen and ink drawing techniques, with incredibly clear instruction on fundamentals, details, and building texture.
Online Communities & Forums:
- Reddit:
- r/ArtFundamentals (Drawabox): A structured, exercise-based program for learning core drawing fundamentals, with a strong emphasis on construction and spatial reasoning. It's challenging but very rewarding.
- r/learnart: A supportive community for artists of all levels to share their work, ask for constructive critique, and discuss their learning processes and challenges.42
- r/drawing: A general drawing community for sharing artwork, admiring others' creations, and engaging in discussions about all things drawing.61
- r/ArtistLounge: A place for more general discussions among artists about various topics, including techniques, career advice, art philosophy, and the artist life.2
- DeviantArt: A large and long-standing online art community with a vast collection of tutorials, resources, and groups dedicated to various art styles and learning paths.
- ConceptArt.org (Archives/Legacy): While the forums are less active now than in their heyday, the archives contain an absolute goldmine of information, critiques, and discussions from professional artists and dedicated learners.
- Discord Servers: Many art YouTubers, online communities, and even some educational platforms have dedicated Discord servers. These are great for real-time chat, sharing your work, getting quick feedback, and connecting with other artists.
This list provides a solid starting point for your continued exploration and growth. Remember, the best resources will often depend on your individual learning style, your specific interests, and your unique artistic goals. The real key is to engage actively with the material, practice consistently (even if it's just a little each day), and critically evaluate the information you encounter, always asking "how can this help *me* grow?"
9. Wrapping Up: Smarter Sketching Ahead
Drawing hacks, in all their diverse and ingenious forms, represent far more than just simple shortcuts. They stand as a testament to ongoing artistic ingenuity and that persistent human drive to master complex skills with greater ease, efficiency, and enjoyment. From historical aids like the clever camera obscura to the powerful modern digital tools and countless clever technique modifications we've explored, these methods primarily serve to lower initial barriers, build crucial confidence, and often accelerate the learning process.
The undeniable psychological appeal of hacks, rooted in the deep satisfaction of achieving "quick wins" and the relief of simplifying daunting tasks, plays a vital role in motivating learners. This is especially true in the challenging early stages of their artistic journey, helping to keep the creative flame alive.
However, the true, lasting power of drawing hacks is realized when they are not seen as an *alternative* to fundamental skills, but rather as a valuable *complement* to them. An over-reliance on hacks without a corresponding understanding of the underlying principles of observation, construction, perspective, and value can unfortunately lead to superficial knowledge and eventual skill stagnation. The most effective and rewarding path involves using hacks as intelligent stepping stones. This means deconstructing them to grasp the core concepts they so cleverly simplify, and then gradually transitioning towards more robust, versatile, and deeply internalized abilities.
Ultimately, "Drawing Hacks: The Ultimate Playbook for Faster, Smarter Sketching" aims to equip artists of all stripes with a nuanced and empowering understanding of these techniques. By categorizing a wide array of hacks, explaining their mechanisms, fairly evaluating their pros and cons, and clearly showing how they can connect to foundational learning, this report empowers hobbyists, students, educators, and aspiring artists alike. The goal is to integrate these smart methods into your practice thoughtfully and effectively.
The aim, after all, is not just to draw faster, but to draw smarter, fostering a more engaging, rewarding, and sustainable relationship with the wonderful art of sketching. Happy hacking, and happy drawing!
Works cited
- 14 Genius Drawing Hacks - Online Art Lessons, https://onlineartlessons.com/tutorial/14-genius-drawing-hacks/
- What is an art "hack" or tip that you learned that basically changed ..., https://www.reddit.com/r/ArtistLounge/comments/1dpd287/what_is_an_art_hack_or_tip_that_you_learned_that/
- A "hack" in art? : r/arthelp - Reddit, https://www.reddit.com/r/arthelp/comments/1i1qazk/a_hack_in_art/
- Drawing Exercises to Improve Drawing Skill - The Virtual Instructor, https://thevirtualinstructor.com/blog/drawing-exercises-to-improve-drawing-skill
- How to Hack a Painting | Tyler Hobbs, https://www.tylerxhobbs.com/words/how-to-hack-a-painting
- Procreate Tips and Tricks You Should Know - 🖌️ Procreate.courses, https://procreate.courses/blog/procreate-tips
- Focus on Photography, Art History, The Camera Obscura, https://www.davisart.com/sites/default/assets/File/focus-on-photography-art-history-camera-obscura.pdf
- 8 figure drawing tips for beginners - Rest Less, https://restless.co.uk/leisure-and-lifestyle/art-and-culture/figure-drawing-tips-for-beginners/
- 10 Drawing Hacks That'll Instantly Make You a Better Artist|, https://skyryedesign.com/art/drawing/10-genius-drawing-hacks-every-artist-should-know/
- Reclaiming the Arts in Public Schools | Psychology Today, https://www.psychologytoday.com/us/blog/raising-resilient-children/202504/reclaiming-the-arts-in-public-schools
- The Importance of Art Education in the Classroom - UF Online, https://arteducationmasters.arts.ufl.edu/articles/importance-of-art-education/
- The 5-Minute Rule: A Science-Backed Technique to Plan Your Day Without Overwhelm, https://ahead-app.com/blog/confidence/the-5-minute-rule-a-science-backed-technique-to-plan-your-day-without-overwhelm-20250122-024925
- Unlock Motivation with Small Wins: The Science of Dopamine | Center for Integrative Care (a Mancini Acupuncture company), https://manciniacupuncture.com/unlock-motivation-with-small-wins-the-science-of-dopamine/
- Gamification: A Game-Changer in the Arts and Cultural Industries | Global Leaders Institute, https://www.globalleadersinstitute.org/blog-post/gamification-a-game-changer-in-the-arts-and-cultural-industries/
- Gamification in the training of future culture and art professionals: experience of EU countries - ResearchGate, https://www.researchgate.net/publication/360799721_Gamification_in_the_training_of_future_culture_and_art_professionals_experience_of_EU_countries
- Cognitive Shortcuts: Labels and Relationships - Psychology Fanatic, https://psychologyfanatic.com/cognitive-shortcuts/
- Heuristics: How Mental Shortcuts Help Us Make Decisions [2025] - Asana, https://asana.com/resources/heuristics
- On the cognitive bases of illusionism - PMC, https://pmc.ncbi.nlm.nih.gov/articles/PMC7453929/
- Cognitive Hacking: Manipulating Perception, Influencing Decisions, https://www.cyber-espionage.ch/Cognitive_Hacking.html
- 2 Minute Art Hack - How to Draw your Lines with Confidence! - YouTube, https://www.youtube.com/watch?v=nU0IHpgL2lY
- It seems like a lot of new artists don't actually like making art. - Reddit, https://www.reddit.com/r/ArtistLounge/comments/1j87mly/it_seems_like_a_lot_of_new_artists_dont_actually/
- British History in depth: Vermeer and the Camera Obscura - BBC, https://www.bbc.co.uk/history/british/empire_seapower/vermeer_camera_01.shtml
- Drawing with a Grid - ArtGraphicA, http://www.artgraphica.net/learn-to-draw/learn-to-draw-with-a-grid.html
- The Use of the Grid in Drawing - Wix.com, https://mail07077.wixsite.com/drawingandpainting/lecture-using-grids
- Proportional Dividers | National Museum of American History, https://americanhistory.si.edu/collections/object-groups/dividers-compasses/proportional-dividers
- Proportional dividers | Royal Museums Greenwich, https://www.rmg.co.uk/collections/objects/rmgc-object-42765
- Grid Drawing: The Pros and Cons and the Tips and Tricks - My Art ..., https://myartlesson.com/grid-drawing-the-pros-and-cons-and-the-tips-and-tricks
- 14 Drawing Techniques Every Artist Should Know - Discount Art n ..., https://discountartncraftwarehouse.com.au/blog-2138/drawing-techniques-every-artist-should-know
- Top 20 quick drawing tips to make you a better artist - Gathered, https://www.gathered.how/arts-crafts/art/drawing-tips
- 10 Easy Anime Drawing Tips for Beginners, https://www.thebeginnerdrawingcourse.com/blogforartists/2024/6/9/10-easy-anime-drawing-tips-for-beginners
- Charcoal Pencil Drawing Tricks Even Cats Could Master - Full Bloom Club, https://fullbloomclub.net/charcoal-pencil-drawing/
- How to Get Better at Drawing: Train Your Eyes to See Like an Artist, https://www.artiststrong.com/how-to-get-better-at-drawing-train-your-eyes-to-see-like-an-artist/
- How to Teach Drawing to Kids | Basic Drawing Tricks! - YouTube, https://www.youtube.com/watch?v=LoJ6_KrsP3U&pp=0gcJCdgAo7VqN5tD
- 53 Best drawing tricks ideas | drawing tutorial, easy drawings, drawings - Pinterest, https://www.pinterest.com/irenevelasco75/drawing-tricks/
- Fun and Simple Drawing Tricks Easy Tips on How to Draw | kids Drawing Ideas For Kids - Step by Step - YouTube, https://www.youtube.com/watch?v=bPORPg-Si-4
- Drawing Just Got Easier! 8 Genius, Must-Try Hacks for Art Teachers - YouTube, https://www.youtube.com/watch?v=LI-PPP6JUEk
- A Foil Art "How-To" by Peaceable Kingdom - YouTube, https://www.youtube.com/watch?v=2FAiMWOjyio
- Eco-Friendly Cleanup Hacks for Making Low-Mess Art with Kids - Central Mass Mom, https://centralmassmom.com/eco-friendly-cleanup-hacks-for-making-low-mess-art-with-kids/
- 5 Essential Tricks for Drawing in Perspective - TikTok, https://www.tiktok.com/@prokotv/video/7444627152173124910
- 5 EASY HACKS To Create BETTER Drawings (In Perspective ..., https://www.youtube.com/watch?v=G5mcqOyQiYI
- How to Draw Manga & Anime - Beginners 6 Step Guide | Adobe, https://www.adobe.com/uk/creativecloud/illustration/discover/how-to-draw-manga.html
- How can people who draw anime do the lineart fast? : r/learnart - Reddit, https://www.reddit.com/r/learnart/comments/10d70un/how_can_people_who_draw_anime_do_the_lineart_fast/
- Get Better and Faster at Drawing Comics With 11 Handy Tips, https://matthewchilders.com/drawing-tips/
- 11 tips for Improving Your Skills at Drawing Comics, https://ramstudioscomics.com/index.php/2019/03/26/11-tips-for-improving-your-skills-at-drawing-comics/
- Squiggle Grid / Doodle Grid - Upscale Mural Technique - happy decay, https://happydecay.com.au/squiggle-grid-doodle-grid/
- accessed December 31, 1969, httpshttps://myartlesson.com/grid-drawing-the-pros-and-cons-and-the-tips-and-tricks
- Loomis Method - Beginner's Guide on How To Draw Heads, https://www.21-draw.com/loomis-method/
- Grid vs. Loomis vs. reference : r/learntodraw - Reddit, https://www.reddit.com/r/learntodraw/comments/1h4z9cs/grid_vs_loomis_vs_reference/
- Drawing hacks - Anna Bregman Portraits, https://www.annabregmanportraits.co.uk/project/drawing-hacks/
- 11 charcoal techniques – Mont Marte Global, https://www.montmarte.com/blogs/tips-techniques/11-charcoal-techniques
- 10 Procreate Tricks to Instantly Improve Your Drawings! - YouTube, https://www.youtube.com/watch?v=UVVpAKdW0Qg
- Keyboard Shortcut Guide for Artists | Art Rocket - Clip Studio Paint, https://www.clipstudio.net/how-to-draw/archives/155375
- Artists, Beware! You Won't Believe These 10 Eco-Art Hacks That Are ..., https://www.jerrypoon.com/post/10-easy-eco-friendly-art-practices
- How to make textured paint (13 ways) for DIY, art & crafts - Claire Douglas Styling, https://clairedouglasstyling.co.uk/post/how-to-make-textured-paint
- DIY Textured Canvas Art - Jenna Sue Design, https://www.jennasuedesign.com/diy-textured-canvas-art/
- Pomodoro Technique and Your Music Practice Routine - Berklee Online, https://online.berklee.edu/takenote/pomodoro-technique-and-your-music-practice-routine/
- Does the Pomodoro Technique work for musicians? - RouteNote Blog, https://routenote.com/blog/pomodoro-technique-for-musicians/
- 10 Drawing Exercises for More Confident Lines and Hatching - The Virtual Instructor, https://thevirtualinstructor.com/blog/10-exercises-for-confident-lines-and-accurate-hatching
- The Neuroscience of Art: How Creativity Boosts Brain Function - Meet The Masters, https://meetthemasters.com/the-neuroscience-of-art-how-creativity-boosts-brain-function/
- What Happens In Your Brain When You Make Art : Shots - Health ..., https://www.npr.org/sections/health-shots/2020/01/11/795010044/feeling-artsy-heres-how-making-art-helps-your-brain
- This is what happens if you never learn the basics : r/drawing - Reddit, https://www.reddit.com/r/drawing/comments/1j8ph73/this_is_what_happens_if_you_never_learn_the_basics/
- Will training the fundamentals only digitally instead of on paper affect my studies? - Reddit, https://www.reddit.com/r/ArtistLounge/comments/1haz9ej/will_training_the_fundamentals_only_digitally/
- Drawing Shortcuts: Developing Quick Drawing Skills Using Today's Technology: 8601406377462: Leggitt, Jim - Amazon.com, https://www.amazon.com/Drawing-Shortcuts-Developing-Skills-Technology/dp/0470435488
- Drawing Shortcuts Developing Quick Drawing Skills Using Today`s Technology: Jim Leggitt, https://www.amazon.com/Drawing-Shortcuts-Developing-Today%60s-Technology/dp/B0044L17G2
- Art Hacks: Helpful or Harmful? (The PROBLEMS with Art Hacks ..., https://www.youtube.com/watch?v=HyFgucKtx78
- How to Refine a Traced Sketch Freehand - Realistic Acrylic Portrait School, https://realisticacrylic.com/how-to-refine-a-traced-sketch-freehand/
- Secrets to Great Freehand Drawing Techniques - Etchr Lab, https://etchrlab.com/blogs/news/freehand-techniques
- Illustrator Interviews - Only Picture Books, https://www.onlypicturebooks.com/category/illustrator-interviews/
- Interviews - Children's illustrators, https://childrensillustrators.com/illustrators/interviews
- 5 Most Common Drawing Mistakes - Kevin McCain Studios, https://kevinmccainstudios.com/5-common-drawing-mistakes/
- Realistic Drawing Hack - The Virtual Instructor, https://thevirtualinstructor.com/blog/realistic-drawing-hack
- Drawing Problems & Solutions: A Trouble-Shooting Handbook - Amazon.com, https://www.amazon.com/Drawing-Problems-Solutions-Trouble-Shooting-Handbook/dp/0715314955
- List of Free Downloadable Easy Drawing of Bridge for Kids - BYJU'S, https://byjus.com/kids-learning/bridge-drawing-for-kids/