75 Doodles to Draw: Simple, Cute, and Fun Ideas
If you’ve ever found yourself staring at a blank page, pen in hand, and wondering what should I draw? Then you’re in the right place.
This page is all about doodle ideas to draw, whether you're looking for cute doodles, easy doodles, or just something fun to sketch when you’re bored. No pressure, no fancy tools, no experience needed. These are quick, simple drawing ideas anyone can try.
Doodling is more than just idle scribbles. It’s a fun way to relax, improve your drawing confidence, and even spark bigger creative ideas.
Many of these doodles start with simple reference shapes that you'll draw first, then erase as you add details,so keep an eraser handy! I’ve sorted the doodles into different themes to help you find the perfect one to try. Below are quick links if you want to jump straight to a specific section:
14 Cute Doodles to Draw
1. Alien
Step 1: Draw an upside-down U shape for the dome of the spaceship.
Step 2: Add the alien’s face inside the dome and draw an oval ring around the base.
Step 3: Add details like landing legs and dots on the spaceship to finish the scene.

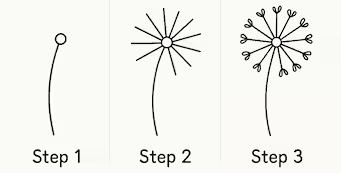
2. Dandelion
Step 1: Draw a curved stem with a small circle on top.
Step 2: Add straight lines radiating outward from the circle to form the seed spokes.
Step 3: Draw small teardrop-shaped loops at the end of each spoke to complete the flower.
3. Easter Egg
Step 1: Draw an egg shape.
Step 2: Add two horizontal curved lines to divide the egg into three sections.
Step 3: Fill the sections with decorations like flowers, waves, and dots.

4. Hatching Egg
Step 1: Start with a plain egg shape.
Step 2: Add a zigzag line across the middle to show a cracked shell.
Step 3: Draw a cute chick emerging from the egg, adding eyes, beak, and wings. Erase the upper half of the egg shell.

5. Flower
Step 1: Sketch a branching stem with two offshoots.
Step 2: Add simple rounded petals on each branch to form basic flowers.
Step 3: Draw smaller lines inside each flower to represent the details.

6. Heart
Step 1: Draw a basic heart shape.
Step 2: Add sparkly stars overlapping the edge of the heart to give it a shining effect, erasing the parts of the heart that are behind the stars.

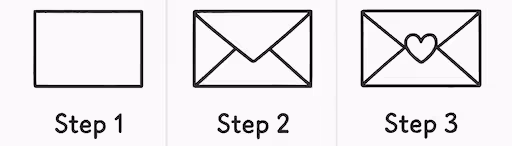
7. Heart Envelope
Step 1: Draw a horizontal rectangle for the envelope base.
Step 2: Add diagonal lines to create the folded envelope flaps.
Step 3: Draw a heart in the center where the flaps meet to finish the love letter look, erasing the edge and making it be part of the bottom of the heart symbol with curved lines.
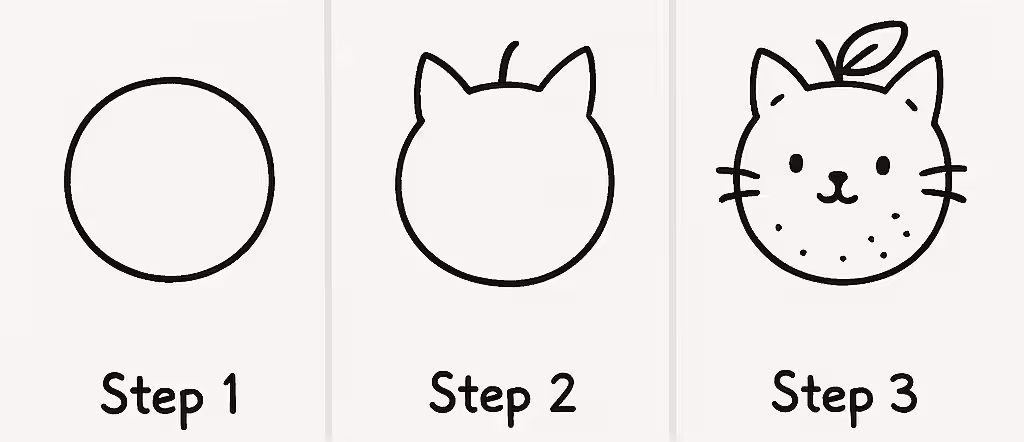
8. Kitty
Step 1: Draw a circle for the head.
Step 2: Add two triangle ears and a curved stem on top for a leaf, erasing the parts of the circle where ears are drawn.
Step 3: Add facial features, whiskers, and a leaf on top to complete the cat.
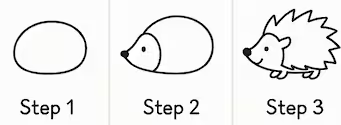
9. Porcupine
Step 1: Draw a horizontal oval for the body.
Step 2: Use the oval as a reference and erase as needed to add a triangular face outline and a dot for the eye and nose.
Step 3: Add jagged spikes for quills and little legs to complete the porcupine usig the outline for reference.
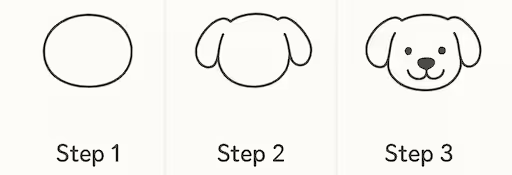
10. Puppy
Step 1: Start with an oval shape for the puppy’s head to be used as reference.
Step 2: Add floppy ears on both sides.
Step 3: Draw the eyes, nose, and smiling mouth to finish the face.
11. Robot
Step 1: Draw a rounded square for the head with a vertical antenna sticking up.
Step 2: Add the robot’s face and a similar rounded square below for the body.
Step 3: Draw ears, arms with claw hands, and legs with rectangular feet.

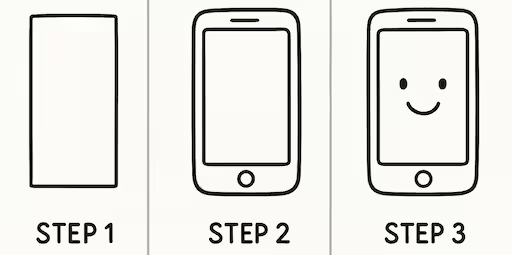
12. Smartphone
Step 1: Start with a vertical rectangle with rounded corners.
Step 2: Draw a smaller rectangle inside for the screen and add a button and speaker.
Step 3: Add a simple smiling face on the screen to give it personality.
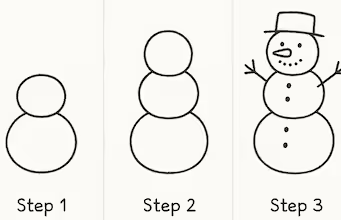
13. Snowman
Step 1: Draw two stacked circles for the base and middle of the snowman.
Step 2: Add a third smaller circle on top for the head.
Step 3: Draw the hat, face, arms, buttons, and a carrot nose to complete the snowman.
14. Sun
Step 1: Start with a simple circle for the sun.
Step 2: Draw short lines radiating outward around the circle for sun rays.
Step 3: Add a cheerful face to the sun with eyes and a smile.

13 Easy Doodles to Draw
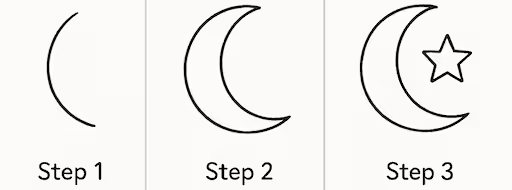
1. Crescent Moon
Step 1: Draw a large curved line shaped like a C.
Step 2: Add an inner curved line to form the crescent moon.
Step 3: Draw a star overlapping the right side of the moon.
2. Envelope
Step 1: Draw a simple rectangle.
Step 2: Add a triangle pointing downward to form the envelope flap.
Step 3: Complete the envelope by drawing diagonal lines from the bottom corners to the flap.

3. Fireworks
Step 1: Start with a single vertical line.
Step 2: Add curved burst lines radiating from the top to form an explosion.
Step 3: Draw star shapes at the ends of some lines to finish the fireworks effect.

4. Glasses
Step 1: Draw one circle for a lens.
Step 2: Add a second circle next to it and connect them with a small bridge.
Step 3: Draw short side arms extending from each side of the glasses.

5. Magic Wand
Step 1: Draw a diagonal straight line.
Step 2: Outline the wand by thickening the line into a rounded rectangle.
Step 3: Add sparkles and dots around the wand to give it a magical touch.

6. Pebbles
Step 1: Draw a medium-sized oval.
Step 2: Stack a smaller oval on top of it.
Step 3: Add a larger oval at the bottom to complete the balanced pebble pile.

7. Rain Cloud
Step 1: Draw a short curved line as the base of the cloud.
Step 2: Add a series of bumps above the curve to complete the cloud shape.
Step 3: Draw several vertical lines underneath the cloud to represent rain.

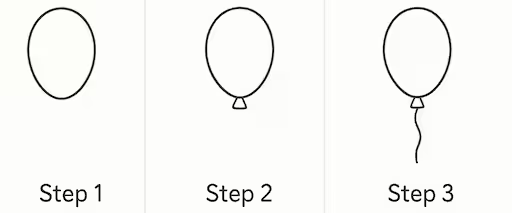
8. Balloon
Step 1: Draw a vertical oval shape for the balloon.
Step 2: Add a small triangle at the bottom for the balloon knot.
Step 3: Draw a long, curvy line downward to represent the string.
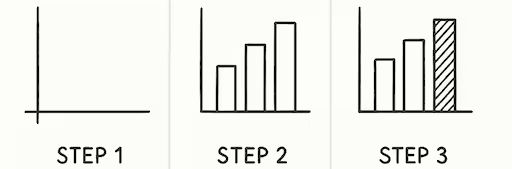
9. Bar Chart
Step 1: Draw an L-shaped set of axes for the chart.
Step 2: Add three vertical bars of increasing height.
Step 3: Shade or pattern the tallest bar to highlight it.
10. Clover
Step 1: Draw one heart shape for the first leaf.
Step 2: Add one more heart shapes and a curved line downward for the stem.
Step 3: Add the third heart, adjust the layout so all three heart leaves connect at the stem to complete the clover.

11. Road
Step 1: Draw a horizontal line at the top and two angled lines converging below it to form the road's perspective.
Step 2: Add a dashed vertical line in the center of the road to represent lane markings.
Step 3: Draw two additional angled lines on each side of the road to create road shoulders or barriers.

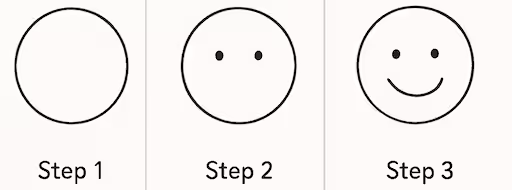
12. Smiley Face
Step 1: Draw a perfect circle for the outline of the face.
Step 2: Inside the circle, draw two evenly spaced filled dots for eyes.
Step 3: Add a curved line below the eyes to form a smiling mouth.
13. Umbrella
Step 1: Draw a large curved arc like a wide upside-down "U" for the top of the umbrella.
Step 2: Draw a straight vertical line down from the middle of the arc to form the umbrella's handle.
Step 3: Add a scalloped line to the bottom of the arc and a hook at the bottom of the handle to complete the umbrella.

10 Food Doodles
1. Coffee Cup
Step 1: Draw a horizontal oval for the cup’s opening.
Step 2: Add the cup’s body and handle connecting to the oval.
Step 3: Draw liquid inside the cup with a few cubes and add wavy lines above to represent steam.

2. Croissant
Step 1: Draw a crescent moon shape to form the basic outline.
Step 2: Add curved bands across the shape to represent the flaky layers.
Step 3: Refine the edges and add small texture lines for a detailed baked look.

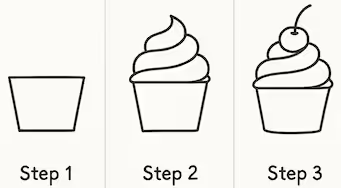
3. Cupcake
Step 1: Draw a trapezoid shape for the cupcake base.
Step 2: Add a swirling line above the base to form the frosting.
Step 3: Draw a cherry with a stem on top to complete the cupcake.
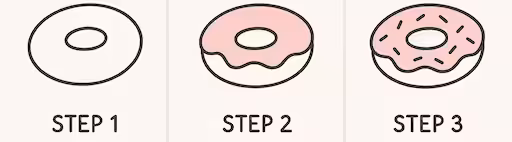
4. Donut
Step 1: Draw two concentric ovals to form the shape of a donut.
Step 2: Add a wavy frosting line on top and fill in with color.
Step 3: Draw small sprinkle shapes scattered across the frosting.
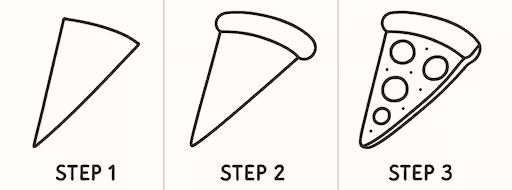
5. Pizza Slice
Step 1: Sketch a triangle shape with a slightly curved edge at the top.
Step 2: Draw the crust as a rounded, thickened band along the top edge.
Step 3: Add pepperoni circles and small dots for toppings.
6. Strawberry
Step 1: Draw a rounded heart-like shape for the strawberry body.
Step 2: Add leaves and a short stem on top.
Step 3: Draw small oval seeds scattered evenly across the fruit.

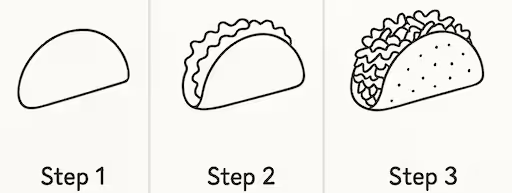
7. Taco
Step 1: Draw a semi-circle with a slightly flattened bottom.
Step 2: Add wavy lines along the top to represent lettuce and fillings.
Step 3: Draw texture dots on the shell and more ingredients inside.
8. Watermelon Slice
Step 1: Draw a triangle with a curved base.
Step 2: Add a thick curved line near the bottom for the rind.
Step 3: Draw teardrop-shaped seeds inside the triangle.

9. Avocado
Step 1: Draw an egg-like shape to represent the avocado outline.
Step 2: Add a smaller oval in the center for the seed pit.
Step 3: Draw an extra outline around one side to show thickness and dimension.

10. Sushi Roll
Step 1: Draw a simple circle for the roll’s top.
Step 2: Add textured rice details inside the circle.
Step 3: Draw the filling in the center and add depth with side and base details to form a full roll.

12 Nature Doodles
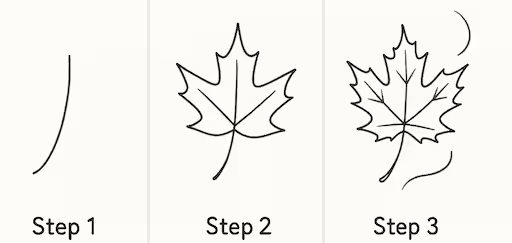
1. Maple Leaf
Step 1: Draw a long curved line to form the leaf's stem and central vein.
Step 2: Sketch the five main points of the maple leaf branching from the central line.
Step 3: Add jagged edges to the leaf and smaller veins for detail and movement lines around the leaf.
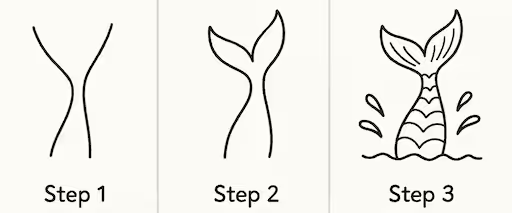
2. Mermaid Tail
Step 1: Draw two curving vertical lines that taper inward to form the tail base.
Step 2: Add a split fin at the top of the tail.
Step 3: Draw scale details, splash lines, and water below the tail.
3. Mountain Scene
Step 1: Draw a single jagged mountain peak line.
Step 2: Add overlapping smaller peaks on each side.
Step 3: Draw a sun rising between the mountains and add sun rays.

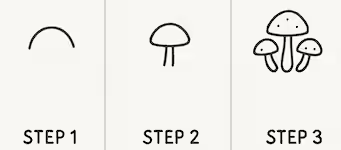
4. Mushrooms
Step 1: Draw a simple curved cap like an upside-down "U".
Step 2: Add a stem under the cap to form one mushroom.
Step 3: Draw more mushrooms in different sizes with dots for texture.
5. Pinecone
Step 1: Draw a large vertical oval.
Step 2: Add three evenly spaced wavy lines inside to form horizontal layers.
Step 3: Fill in overlapping scale shapes and add a small stem on top.

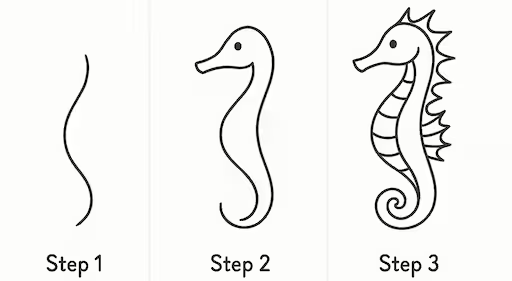
6. Seahorse
Step 1: Draw a long, smooth S-shaped curve.
Step 2: Outline the body around the curve and add an eye.
Step 3: Add a curled tail, back fins, spines, and belly segments.
7. Cactus
Step 1: Draw a vertical capsule shape for the main body.
Step 2: Add arms curving outward on both sides.
Step 3: Draw a plant pot at the bottom and add small spikes on the cactus.

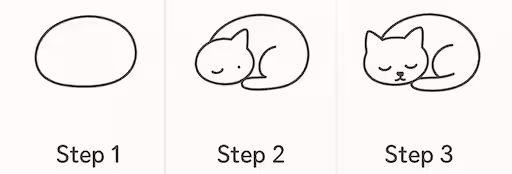
8. Sleeping Cat
Step 1: Draw an oval for the curled-up body.
Step 2: Add the head shape, one eye, and a curved tail.
Step 3: Draw closed eyes, ears, and a small nose to complete the face.
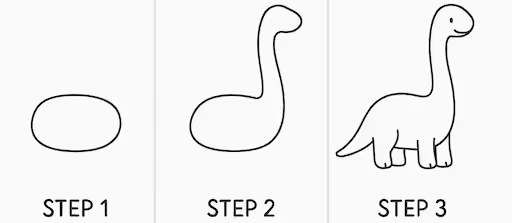
9. Dinosaur
Step 1: Start with a horizontal oval for the body.
Step 2: Add a long neck with a rounded head.
Step 3: Draw legs, a tail, and facial details to complete the dinosaur.
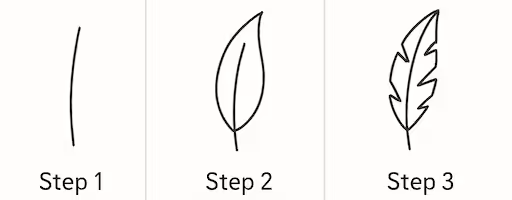
10. Leaf with Jagged Edges
Step 1: Draw a vertical curved line for the stem.
Step 2: Add a pointed oval around the line and a center vein.
Step 3: Modify the outer edges with notches to create a feathered look.
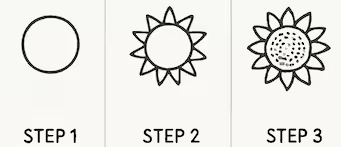
11. Sunflower
Step 1: Draw a circle to form the center of the sunflower.
Step 2: Add pointed petals all around the circle.
Step 3: Fill the center with small dots to represent sunflower seeds.
12. Tree
Step 1: Draw a fluffy cloud-like shape for the tree foliage.
Step 2: Add two short curved lines extending downward to form the trunk.
Step 3: Add texture to the foliage using small humps and refine the trunk base for realism.

26 Everyday Object Doodles
1. Bicycle
Step 1: Draw two evenly spaced circles for the wheels.
Step 2: Add the frame, seat, and handlebars, connecting both wheels.
Step 3: Add spokes inside the wheels and draw pedals and chain details.

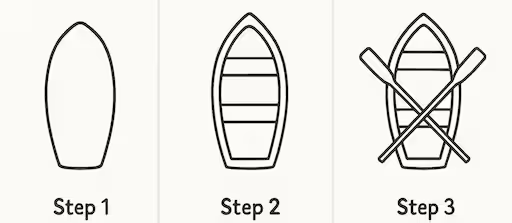
2. Rowboat
Step 1: Draw a vertical oval shape for the boat outline.
Step 2: Add the interior lines to create the seating sections.
Step 3: Draw two crossed oars over the boat for final detail.
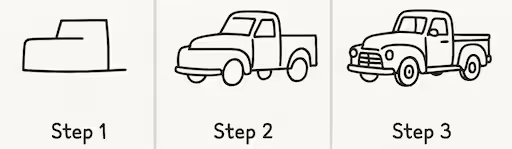
3. Pickup Truck
Step 1: Sketch the simple outline of the cab and hood.
Step 2: Add the wheels, windows, truck bed, and outline details.
Step 3: Add the front grille, lights, door handles, and refine line work.
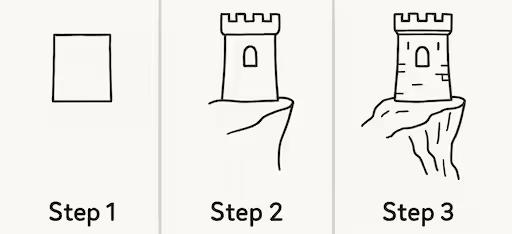
4. Castle Tower
Step 1: Draw a tall rectangle for the main tower shape.
Step 2: Add battlements on top, a window, and sketch the cliff base.
Step 3: Add stone details, cracks, and shading to complete the look.
5. Chemistry Flask
Step 1: Draw two short curved lines for the neck outline.
Step 2: Complete the flask shape with a circular body and oval lip.
Step 3: Add bubbles, liquid waves inside the flask, and small details.

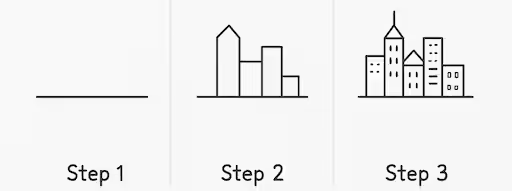
6. City Skyline
Step 1: Draw a horizontal ground line.
Step 2: Add a variety of rectangles and building shapes on the line.
Step 3: Add windows, doors, and rooftops to complete the skyline.
7. Hoodie on Hanger
Step 1: Draw a simple hanger shape.
Step 2: Add the outline of a hoodie over the hanger.
Step 3: Draw hoodie details like the pocket, cuffs, and drawstrings.

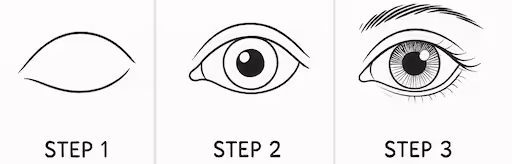
8. Eye
Step 1: Draw the outline of the upper and lower eyelids.
Step 2: Add the iris, pupil, and inner eye fold details.
Step 3: Add lashes, eyebrow, and detailed texture to the iris.
9. Backpack
Step 1: Draw a vertical rounded rectangle for the main body.
Step 2: Add a curved flap shape on top of the backpack.
Step 3: Draw straps, a front pocket, and a buckle to complete it.

10. Beach Umbrella
Step 1: Draw a slightly tilted vertical line for the pole.
Step 2: Add a curved half-circle canopy on top of the pole.
Step 3: Add canopy sections and a wavy ground line for sand.

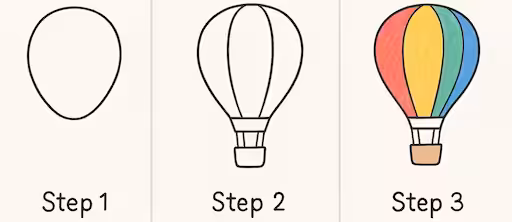
11. Hot Air Balloon
Step 1: Draw a large teardrop shape for the balloon.
Step 2: Add vertical curved sections and a basket underneath.
Step 3: Color each section of the balloon and the basket to complete the look.
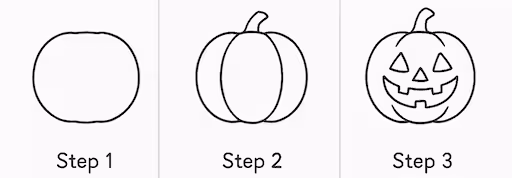
12. Jack-o'-Lantern
Step 1: Draw a round pumpkin shape with subtle ridges.
Step 2: Add curved lines to define sections and draw a stem on top.
Step 3: Draw triangle eyes, a nose, and a jagged mouth for the face.
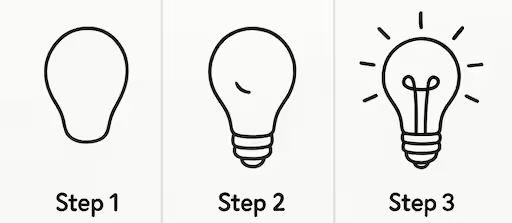
13. Light Bulb
Step 1: Draw the general bulb shape like an upside-down teardrop.
Step 2: Add the screw base and a small inner reflection line.
Step 3: Add filament lines inside the bulb and radiating lines outside to show it's lit.
14. Magician Hat
Step 1: Draw a flat horizontal oval for the brim.
Step 2: Add a tall cylinder shape rising from the brim.
Step 3: Add band details and shading lines to complete the hat.

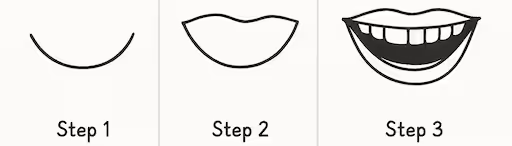
15. Smiling Mouth
Step 1: Draw a curved line like a shallow U for the bottom lip.
Step 2: Add the upper lip with a gentle M shape.
Step 3: Draw the full smile with teeth, gums, and shading for depth.
16. Musical Note
Step 1: Draw a vertical line with a slight hook at the bottom.
Step 2: Add an oval at the bottom of the line to form the note head.
Step 3: Draw a curved flag extending from the top of the line.

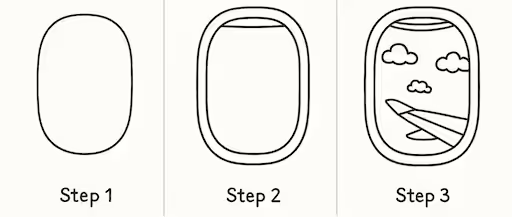
17. Airplane Window
Step 1: Draw a tall, rounded rectangle for the window shape.
Step 2: Add a smaller rounded shape inside to form the inner frame.
Step 3: Draw clouds and a wing silhouette to show a view from the window.
18. Rocket Ship
Step 1: Draw a tall oval shape for the rocket body.
Step 2: Add two symmetrical fins on each side and a bottom engine section.
Step 3: Draw window details, antenna, and fire/flames from the base for launch effect.

19. Skateboard
Step 1: Draw a long, rounded rectangle for the deck.
Step 2: Add four curved notches where the trucks will be placed.
Step 3: Draw the wheels and truck hardware at both ends of the board.

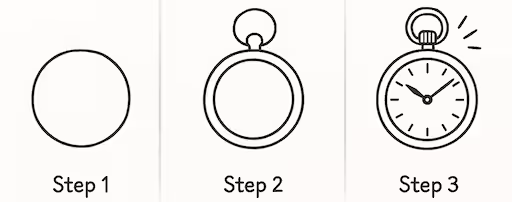
20. Stopwatch
Step 1: Draw a large circle for the watch face.
Step 2: Add an inner ring and a small knob at the top.
Step 3: Draw clock hands, hour marks, and accent lines for emphasis.
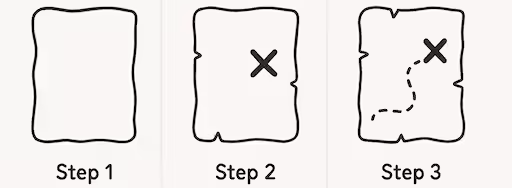
21. Treasure Map
Step 1: Draw a wavy-edged rectangle to resemble an old paper map.
Step 2: Add a large "X" to mark the treasure spot.
Step 3: Draw a dashed path leading to the "X" and add small map details.
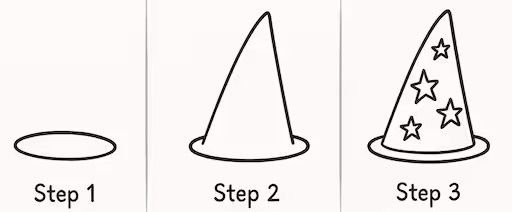
22. Wizard Hat
Step 1: Draw a vertical curved line for the stem.
Step 2: Add a pointed oval around the line and a center vein.
Step 3: Modify the outer edges with notches to create a feathered look.
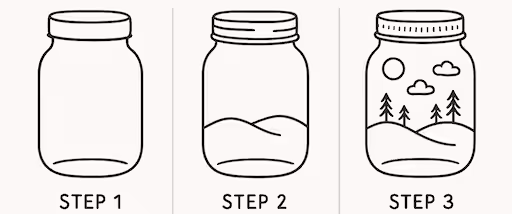
23. Forest in a Jar
Step 1: Draw the outline of a mason jar with a lid.
Step 2: Add pointed petals all around the circle.
Step 3: Fill the center with small dots to represent sunflower seeds.
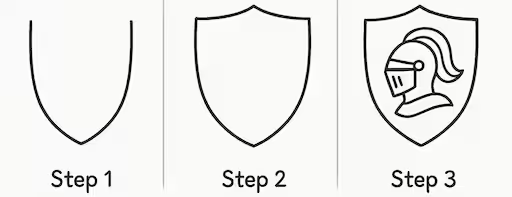
24. Knight Shield
Step 1: Draw a curved "V" shape for the bottom of the shield.
Step 2:Add a top border to close the shield shape.
Step 3: Draw a knight’s helmet inside the shield for decoration.
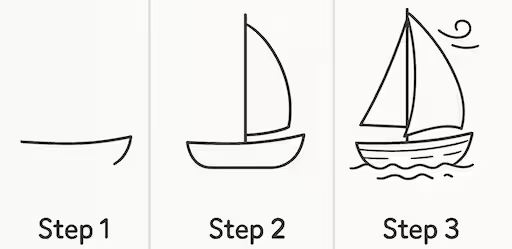
25. Sailboat
Step 1: Draw the base of the boat with a simple curved line.
Step 2: Add the hull, a vertical mast, and a single sail.
Step 3: Draw the second sail, add water lines, and wind swirl for motion.
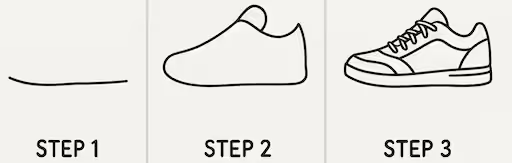
26. Shoe
Step 1: Draw a gently curved horizontal line for the sole.
Step 2: Add the outline of the upper shoe and tongue.
Step 3: Add details like laces, overlays, and a sole pattern to finish.